“You’ve got to try this peanut butter cup fudge,” my neighbor said over the fence last weekend, waving a small container like it was a treasure chest. Honestly, I was skeptical. Fudge? No-bake? Only five ingredients? I’m used to fudge recipes that feel like a weekend project—melting chocolate, tempering, waiting hours. But curiosity got the better of me one lazy Sunday afternoon when the kitchen felt too hot to even consider turning on an oven.
I pulled together the ingredients, half-expecting it to be a miss, but within minutes, the sweet, nutty aroma filled the room. The texture? Silky smooth with a bit of that classic peanut butter cup magic. I kept nibbling, then slicing, and by the next day, it was practically gone. I swear this recipe snuck into my routine, popping up for a quick sweet fix more times than I care to admit. The best part—no oven, no fuss, just pure, simple indulgence. That’s why this easy 5-ingredient peanut butter cup fudge recipe stuck around in my kitchen and heart.
It’s funny how sometimes the simplest things turn out to be the most satisfying. Like the time I experimented with that easy no-churn cookies and cream ice cream, which also came together in minutes and became an instant favorite. This fudge shares that same charm—minimal ingredients, maximum joy. If you’re anything like me, juggling life’s chaos and craving something sweet without the hassle, this recipe might just become your new go-to comfort.
Why You’ll Love This Recipe
Having tested countless fudge recipes over the years, this one stands out for its simplicity and consistency. The magic lies in how these five ingredients blend to create a luscious treat that tastes like it took hours, but really, it’s a snap.
- Quick & Easy: Comes together in under 15 minutes—ideal for those last-minute dessert cravings or when you want a sweet treat without the wait.
- Simple Ingredients: No need for fancy or hard-to-find items; you likely have peanut butter, chocolate, and sugar in your pantry already.
- Perfect for Parties and Gifting: This fudge is always a hit at potlucks and makes a thoughtful homemade gift during the holidays (I’ve wrapped it up for neighbors more times than I can count).
- Crowd-Pleaser: Kids, adults, even the picky eaters can’t get enough of this rich, creamy delight.
- Unbelievably Delicious: The silky texture paired with the classic peanut butter cup flavor combo makes it irresistible and comforting.
What sets this recipe apart is the no-bake method paired with a careful balance of smooth peanut butter and just the right amount of sweetness. Unlike other fudge recipes that can be grainy or overly sweet, this one has a melt-in-your-mouth quality that keeps you coming back for more. If you love quick sweet treats like the easy cinnamon roll mug cake, this fudge will fit right into your dessert lineup.
What Ingredients You Will Need
This recipe uses simple, wholesome ingredients to deliver bold flavor and satisfying texture without the fuss. Plus, most of these are pantry staples, so you won’t have to make a special trip to the store.
- Creamy Peanut Butter – 1 cup (smooth for best texture; natural or regular both work, but I prefer Skippy for its consistency)
- Powdered Sugar – 2 cups (this sweetens and thickens the fudge; sifted to avoid lumps)
- Unsalted Butter – 1/2 cup (1 stick), softened (adds richness and creaminess)
- Milk Chocolate Chips – 1 cup (for the classic chocolate layer; Ghirardelli or Nestlé Toll House are great choices)
- Vanilla Extract – 1 teaspoon (boosts flavor, don’t skip this!)
If you want to swap things up, use almond butter for a nutty twist or dairy-free butter and coconut milk chocolate chips to make this vegan-friendly. For a gluten-free option, just ensure your powdered sugar brand is certified gluten-free. In summer, adding a handful of chopped roasted peanuts on top adds a nice crunch.
Equipment Needed
- Mixing bowl – a medium to large bowl for combining ingredients
- Microwave-safe bowl or double boiler – for melting chocolate chips smoothly
- Rubber spatula – essential for scraping and folding ingredients without waste
- 8×8-inch square baking pan – for setting the fudge; lined with parchment paper for easy removal
- Measuring cups and spoons – accurate measurements make all the difference
If you don’t have a microwave, a double boiler works wonderfully to melt the chocolate gently. I’ve tried silicone spatulas and wooden spoons, but the rubber ones are best for scraping every bit of fudge out of the bowl. For budget-friendly options, standard glass bakeware works fine, just keep an eye on the set time—it might vary slightly.
Preparation Method
- Prepare your pan: Line an 8×8-inch baking pan with parchment paper, leaving some overhang on the sides for easy fudge removal later. This step saves you from a sticky situation.
- Melt the chocolate: Place 1 cup of milk chocolate chips in a microwave-safe bowl. Microwave in 30-second bursts, stirring after each, until smooth and glossy. This usually takes about 1-2 minutes total. Alternatively, use a double boiler method on the stove.
- Mix peanut butter and butter: In a separate bowl, combine 1 cup creamy peanut butter with 1/2 cup softened unsalted butter. Stir until the mixture is smooth and creamy.
- Add powdered sugar and vanilla: Gradually sift in 2 cups powdered sugar and 1 teaspoon vanilla extract to the peanut butter mixture. Stir well until fully incorporated. The texture should be thick and slightly crumbly but pliable.
- Combine with melted chocolate: Pour the melted chocolate into the peanut butter mixture. Using a rubber spatula, fold everything together gently but thoroughly until you have a smooth, uniform fudge batter.
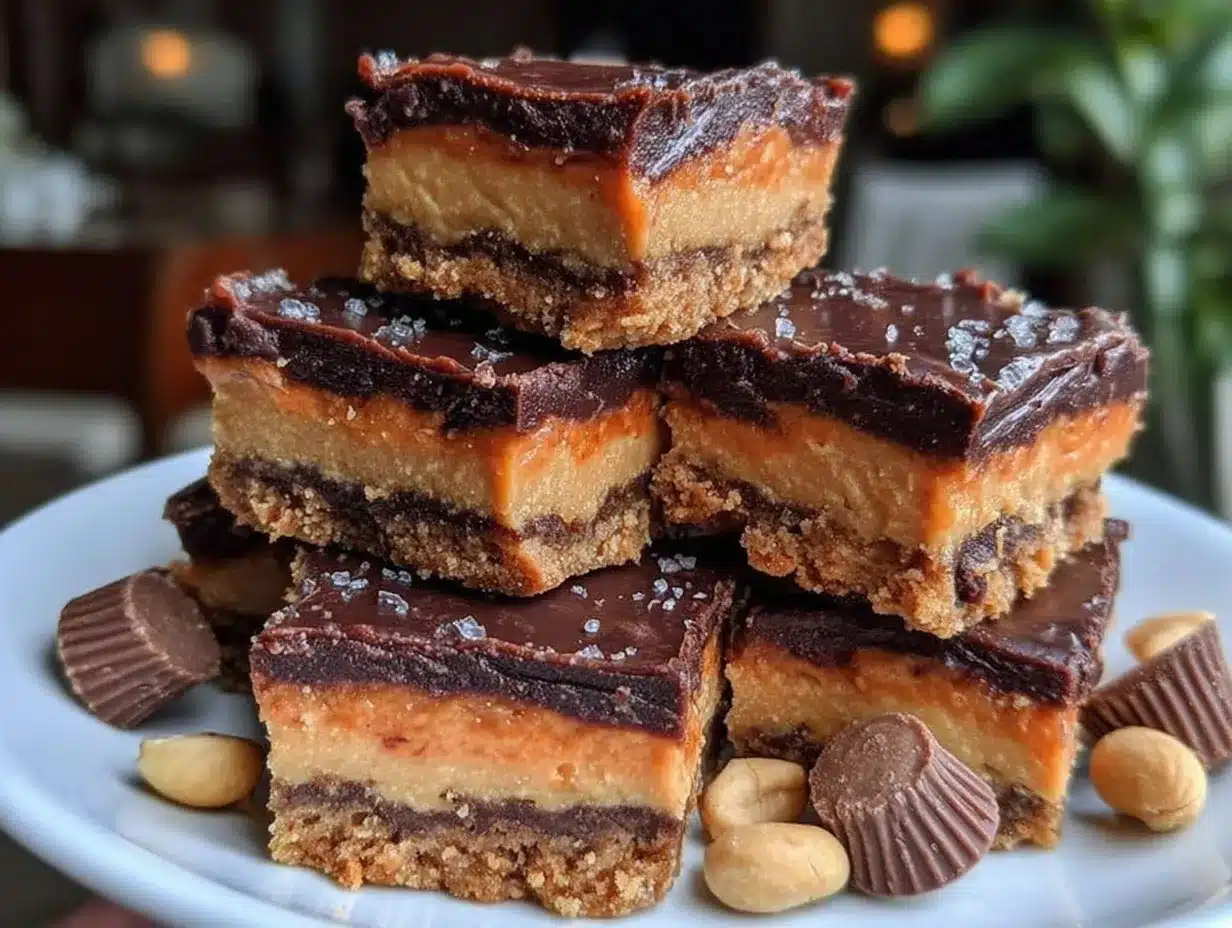
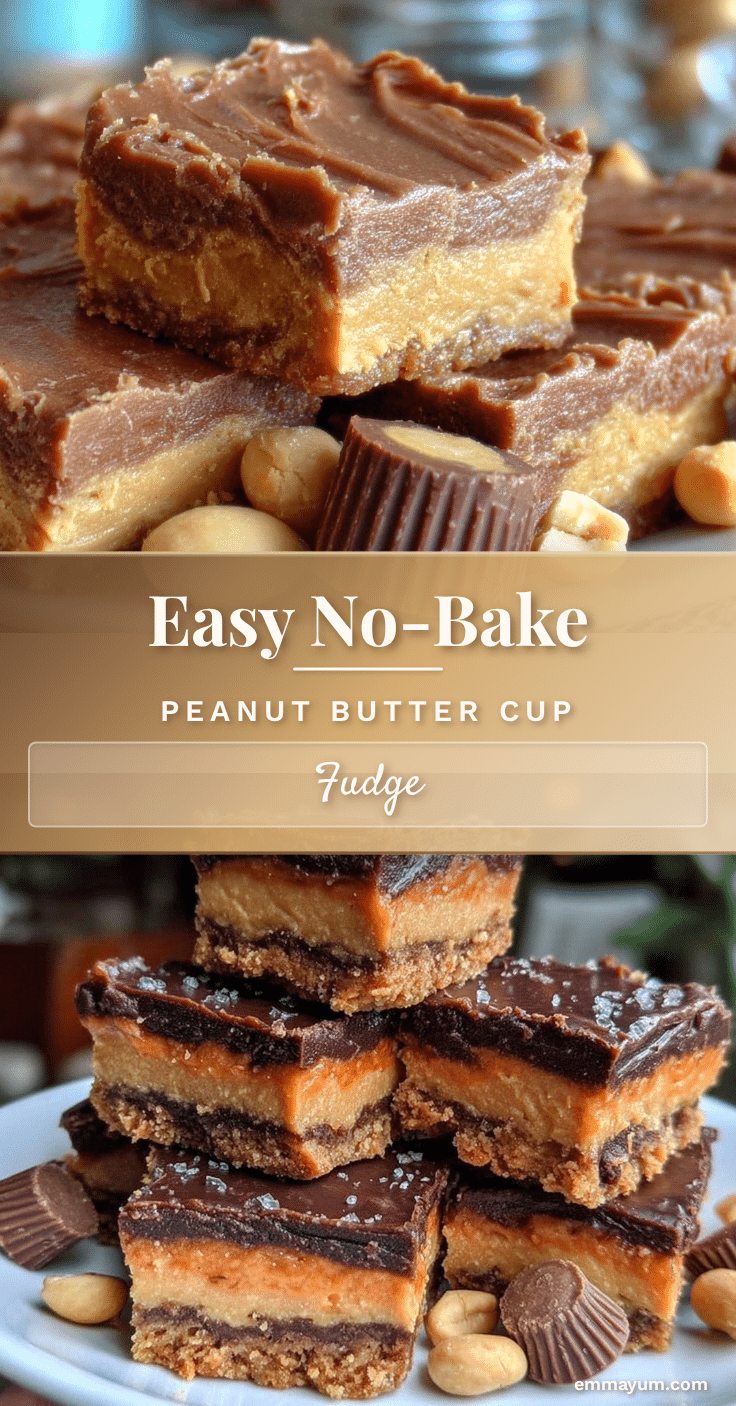
- Transfer to pan and smooth: Pour the fudge mixture into the prepared baking pan. Use the spatula to smooth the top evenly. If you like, sprinkle chopped peanut butter cups or peanuts on top for extra texture.
- Chill until set: Refrigerate the fudge for at least 2 hours or until firm. For faster results, pop it in the freezer for about 30-45 minutes, but watch carefully to avoid freezing solid.
- Slice and serve: Use the parchment paper edges to lift the fudge out of the pan. Slice into small squares with a sharp knife (warm the knife under hot water and dry it off for cleaner cuts).
Pro tip: If your fudge feels too soft when mixing, add a little more powdered sugar, a tablespoon at a time, until you get the right consistency. Also, stirring the chocolate and peanut butter mixture gently prevents it from becoming grainy.
Cooking Tips & Techniques
One of the trickiest parts is melting the chocolate perfectly. Too hot and it can seize; too cool and it won’t blend well. I always recommend microwaving in short bursts and stirring often. This helps keep the chocolate glossy and smooth.
Another tip is to sift your powdered sugar before adding it. It prevents lumps and gives the fudge a silky finish. When mixing, don’t rush—fold ingredients carefully to keep the texture creamy rather than grainy.
For clean slices, chill the fudge thoroughly. I’ve learned the hard way that cutting too soon results in a messier presentation. If your knife sticks, wiping it with a warm towel between cuts works wonders.
Lastly, don’t skip the parchment paper lining—it makes removing fudge from the pan hassle-free. I’ve used silicone molds too for perfectly shaped bites, which is fun for parties.
Variations & Adaptations
- Chocolate Peanut Butter Swirl: Before chilling, dollop melted dark chocolate over the peanut butter fudge and swirl gently with a knife for a marbled effect.
- Nut-Free Version: Use sunflower seed butter instead of peanut butter to accommodate allergies. The flavor changes, but the texture remains delicious.
- Salted Caramel Twist: Drizzle caramel sauce and sprinkle flaky sea salt on top just before refrigerating for a sweet-salty combo.
- Spicy Kick: Add a pinch of cayenne pepper or chili powder to the peanut butter mixture for an unexpected but delightful heat.
- Mini Peanut Butter Cup Addition: Chop your favorite peanut butter cups and fold half into the fudge batter, reserving some for topping.
For a seasonal twist, during the holidays, I love adding crushed peppermint candies on top, which pairs beautifully with the rich peanut butter and chocolate. I’ve also tried swapping in white chocolate chips for a sweeter, creamier fudge experience.
Serving & Storage Suggestions
This fudge is best served chilled or at room temperature. When it’s too cold, the texture firms up nicely, but letting it sit out for a few minutes brings out the creamy peanut butter flavor even more.
Serve with a cup of strong coffee or a cold glass of milk to balance the sweetness. It also works great as a dessert after a cozy meal like a creamy slow cooker potato soup or alongside a rich baked good.
Store fudge in an airtight container in the refrigerator for up to two weeks. You can freeze it for up to 3 months—just thaw in the fridge overnight before serving. The flavors tend to deepen and meld beautifully when stored, so leftovers actually taste better the next day.
Nutritional Information & Benefits
Each piece of this fudge is a rich source of protein and healthy fats thanks to the peanut butter. Here’s an approximate breakdown per serving (based on 16 pieces):
| Calories | 190 |
|---|---|
| Fat | 12g |
| Carbohydrates | 18g |
| Protein | 4g |
| Sugar | 15g |
While it’s a treat and should be enjoyed in moderation, using natural peanut butter boosts heart-healthy fats and adds fiber. Plus, skipping the baking means no added oils or processed ingredients beyond the essentials. It’s a gluten-free dessert option, too, perfect for many dietary needs.
Conclusion
This easy 5-ingredient peanut butter cup fudge isn’t just a recipe—it’s a little moment of joy that fits right into busy days or unexpected sweet cravings. Its no-bake simplicity and classic flavor combo make it a winner, whether you’re making it for a quick snack or a special occasion.
Feel free to tweak the ingredients or add your favorite mix-ins—cooking is all about making it yours. I love how this fudge feels like a comforting hug, easy to prepare and even easier to share (or not!). If you enjoy quick treats like the quick raspberry white chocolate mug brownie, this fudge will definitely become a staple in your dessert rotation.
Let me know how you personalize the recipe, and don’t hesitate to share your tweaks or questions below. Sweet moments like these are better when shared!
Frequently Asked Questions
Can I use crunchy peanut butter instead of creamy?
Yes, you can, but the texture will be chunkier. If you prefer a smooth fudge, stick with creamy peanut butter.
Do I have to refrigerate the fudge?
Refrigeration helps the fudge set and keeps it firm. You can store it at room temperature for short periods, but it may soften.
Can I substitute powdered sugar with granulated sugar?
Powdered sugar dissolves better and gives a smoother texture; granulated sugar may result in grainy fudge.
Is this recipe suitable for vegans?
With substitutions like dairy-free butter and vegan chocolate chips, you can make it vegan-friendly.
How long does the fudge keep?
Stored in the fridge, it lasts up to two weeks. Frozen, it can last up to three months.
Pin This Recipe!
Easy 5-Ingredient Peanut Butter Cup Fudge
A quick and simple no-bake fudge recipe using only five ingredients, delivering a silky smooth peanut butter cup flavor perfect for last-minute desserts and gifting.
- Prep Time: 10 minutes
- Cook Time: 5 minutes
- Total Time: 2 hours 15 minutes
- Yield: 16 servings 1x
- Category: Dessert
- Cuisine: American
Ingredients
- 1 cup creamy peanut butter (smooth preferred)
- 2 cups powdered sugar (sifted)
- 1/2 cup unsalted butter (1 stick), softened
- 1 cup milk chocolate chips
- 1 teaspoon vanilla extract
Instructions
- Line an 8×8-inch baking pan with parchment paper, leaving some overhang for easy removal.
- Melt 1 cup milk chocolate chips in a microwave-safe bowl in 30-second bursts, stirring after each, until smooth and glossy (about 1-2 minutes). Alternatively, melt using a double boiler.
- In a separate bowl, combine 1 cup creamy peanut butter with 1/2 cup softened unsalted butter and stir until smooth and creamy.
- Gradually sift in 2 cups powdered sugar and 1 teaspoon vanilla extract to the peanut butter mixture. Stir well until fully incorporated and thick but pliable.
- Pour the melted chocolate into the peanut butter mixture and fold gently but thoroughly with a rubber spatula until smooth and uniform.
- Transfer the fudge mixture into the prepared baking pan and smooth the top evenly. Optionally, sprinkle chopped peanut butter cups or peanuts on top.
- Refrigerate for at least 2 hours until firm, or freeze for 30-45 minutes for faster setting (avoid freezing solid).
- Lift fudge out using parchment paper edges and slice into small squares with a sharp knife warmed under hot water and dried for clean cuts.
Notes
If fudge is too soft when mixing, add powdered sugar one tablespoon at a time until desired consistency is reached. Melt chocolate in short bursts and stir often to avoid seizing. Sift powdered sugar to prevent lumps. Chill fudge thoroughly before slicing for clean cuts. Use parchment paper for easy removal.
Nutrition
- Serving Size: 1 piece (1/16th of t
- Calories: 190
- Sugar: 15
- Fat: 12
- Carbohydrates: 18
- Protein: 4
Keywords: peanut butter fudge, no-bake fudge, easy fudge recipe, peanut butter cup fudge, quick dessert, 5-ingredient fudge