Let me tell you, the scent of cocoa and vanilla swirling through the kitchen as these tender red velvet heart cookies bake is enough to make anyone’s mouth water. The first time I baked these, I was instantly hooked—the kind of moment where you pause, take a deep breath, and just smile because you know you’re onto something truly special. I still remember when I was knee-high to a grasshopper, watching my grandma frost her famous red velvet cake, and I always wished there was a way to get that same chocolatey, tangy magic in a cookie. Well, years ago, I stumbled upon this recipe that marries those classic flavors into a perfectly soft, melt-in-your-mouth cookie with a luscious cream cheese frosting that’s dangerously easy to spread.
Honestly, my family couldn’t stop sneaking these off the cooling rack (and I can’t really blame them). They’re sweet enough to brighten up any Valentine’s Day gathering but soft and tender enough to feel like a warm hug on a chilly day. Whether you’re looking for a sweet treat for your kids, a charming gift for your sweetheart, or something to add a pop of color and flavor to your Pinterest cookie board, these red velvet heart cookies hit every mark. I’ve tested this recipe multiple times—yes, in the name of research, of course—and it’s become a staple for family gatherings, gifting, and those “just because” moments when you need a little extra love on a plate.
Why You’ll Love This Tender Red Velvet Heart Cookies Recipe
After baking these cookies over and over, I can tell you exactly why they’re a keeper. Here’s what makes this recipe a standout:
- Quick & Easy: Comes together in under 30 minutes, perfect for busy Valentine’s Day prep or last-minute sweet cravings.
- Simple Ingredients: You likely have everything in your pantry already—no fancy shopping trips needed.
- Perfect for Valentine’s Day: The heart shape and red velvet flavor scream love and celebration.
- Crowd-Pleaser: Kids, adults, even picky eaters adore these cookies every single time.
- Unbelievably Delicious: The tender crumb, subtle cocoa, and tangy cream cheese frosting combo is pure nostalgic comfort.
This isn’t just another cookie recipe. The secret lies in the method—folding in the dry ingredients gently to keep the dough soft, and using buttermilk for that signature tang and tenderness. Plus, the cream cheese frosting isn’t just slapped on; it’s whipped light and spread just right so each bite is creamy and balanced. This recipe feels like comfort food reimagined—fast, simple, but with that soulful satisfaction you don’t get from store-bought treats. Honestly, you’re going to want to bookmark this one, especially if you love baking treats that impress without stress.
What Ingredients You Will Need
This recipe uses simple, wholesome ingredients to deliver bold flavor and a satisfying texture without the fuss. Most of these are pantry staples, so you won’t have to run all over town hunting for specialty items.
- For the Cookies:
- All-purpose flour (2 ½ cups / 315g) – Use a trusted brand like King Arthur for consistent texture.
- Unsweetened cocoa powder (2 tablespoons / 15g) – I prefer Dutch-processed for a smoother flavor.
- Baking soda (½ teaspoon) – Helps the cookies rise just right.
- Salt (¼ teaspoon) – Balances the sweetness.
- Unsalted butter (¾ cup / 170g), softened – Adds richness and tenderness.
- Granulated sugar (1 cup / 200g) – Sweetens the dough perfectly.
- Large eggs (2), room temperature – Binds everything together.
- Buttermilk (½ cup / 120ml) – Key for tender crumb and tangy flavor; if you don’t have buttermilk, mix ½ cup milk with 1 teaspoon lemon juice and let sit 5 minutes.
- Vanilla extract (1 teaspoon) – Brings warmth and depth.
- Red food coloring (2 tablespoons) – Use gel for vibrant color without extra liquid.
- White vinegar (1 teaspoon) – Reacts with baking soda for lift and color brightness.
- For the Cream Cheese Frosting:
- Cream cheese (8 oz / 225g), softened – Look for full-fat for best creaminess.
- Unsalted butter (½ cup / 113g), softened – Adds richness and helps frosting hold shape.
- Powdered sugar (3 cups / 360g), sifted – For smooth, lump-free frosting.
- Vanilla extract (1 teaspoon) – Complements the tangy cream cheese.
- Pinch of salt – Balances sweetness.
If you want to make these cookies dairy-free, swap the butter and cream cheese with plant-based alternatives and use almond milk instead of buttermilk. For gluten-free, almond or oat flour can work well, but expect a slightly different texture. In summer, swapping the red food coloring with natural beet powder is a lovely seasonal twist.
Equipment Needed
- Mixing bowls (various sizes) – I always keep a set of glass and stainless steel bowls handy for easy clean-up.
- Electric mixer or stand mixer – Whips the butter and cream cheese frosting perfectly smooth; if you don’t have one, a sturdy hand whisk and some elbow grease work too.
- Measuring cups and spoons – Accurate measurements make all the difference here.
- Rubber spatula – Essential for folding the dry ingredients into the wet without overmixing.
- Baking sheets – Two standard 9×13-inch pans or equivalent; lined with parchment paper for easy release and clean-up.
- Cooling racks – Helps cookies cool evenly and keeps frosting from melting.
- Heart-shaped cookie cutter (about 3 inches) – Optional but totally worth it to get that perfect Valentine’s Day look.
If you’re on a budget or just starting your baking collection, you can grab affordable silicone spatulas and a basic mixer that will cover most of your baking needs. I’ve found that investing in good-quality measuring spoons really helps avoid recipe mishaps.
Preparation Method
- Preheat your oven to 350°F (175°C). Line two baking sheets with parchment paper and set aside.
- Whisk together the dry ingredients: In a medium bowl, sift the flour, cocoa powder, baking soda, and salt. Set this aside.
- Cream the butter and sugar: In a large bowl, use your mixer to beat the softened butter and granulated sugar on medium speed until light and fluffy—about 3 to 4 minutes. You’ll notice the mixture turns pale and airy, which is exactly what you want.
- Add the eggs: Crack in the eggs one at a time, beating well after each addition. The batter might look a bit grainy at this point, but don’t worry, it’ll come together.
- Mix in the wet ingredients: Stir in the vanilla extract, red food coloring, and white vinegar.
- Alternate adding dry ingredients and buttermilk: With your mixer on low, add about a third of the dry ingredients, then half of the buttermilk. Repeat until everything is combined, ending with the dry ingredients. Be gentle here—overmixing can make the cookies tough.
- Chill the dough: Cover the bowl with plastic wrap and refrigerate for at least 30 minutes (up to 2 hours). This step helps the dough firm up, making it easier to roll out and cut.
- Roll and cut: Lightly flour your work surface and roll the dough out to about ¼ inch (6mm) thick. Use your heart-shaped cookie cutter to stamp out cookies, placing them about 2 inches (5cm) apart on the prepared baking sheets.
- Bake: Pop the sheets into the oven and bake for 10 to 12 minutes. You’ll know they’re done when the edges are set but the center still looks soft. Don’t overbake or they’ll lose their tender texture.
- Cool: Let the cookies cool on the baking sheet for 5 minutes, then transfer them to cooling racks to finish cooling completely. This prevents soggy bottoms and keeps them crisp around the edges.
- Prepare the frosting: While the cookies cool, beat the softened cream cheese and butter together until smooth and creamy. Gradually add the sifted powdered sugar, vanilla extract, and a pinch of salt, beating until fluffy and spreadable.
- Frost the cookies: Once cool, spread a generous layer of cream cheese frosting on each cookie. For an extra special touch, use a piping bag with a star tip to pipe the frosting neatly.
If your dough feels too sticky when rolling out, pop it back in the fridge for 10 minutes. And if the frosting gets too soft, a quick chill in the fridge will firm it up without losing that creamy texture. Trust me, these little tricks make a big difference in the final cookie perfection.
Cooking Tips & Techniques
When it comes to baking these tender red velvet heart cookies, timing and technique are your best friends. Here’s what I’ve learned from several batches (and a few burnt edges!):
- Don’t skip chilling the dough. It’s tempting to roll out right away, but chilling firms the dough, prevents spreading, and helps keep the cookies tender.
- Measure flour carefully. Too much flour makes the cookies dry; spoon it lightly into your measuring cup and level it off for accuracy.
- Use room temperature eggs and butter. This ensures even mixing and a smooth batter.
- Mix just until combined. Overmixing develops gluten and toughens the cookies—gently fold the dry ingredients in.
- Watch your oven temperature. If your oven runs hot, cookies might brown too fast. Consider using an oven thermometer to keep it steady at 350°F (175°C).
- Let cookies cool before frosting. Cream cheese frosting melts quickly, so patience is key to pretty, neat cookies.
Honestly, I once skipped the vinegar thinking it was optional and ended up with cookies that were flatter and duller in color—lesson learned! Also, piping the frosting instead of just spreading it gives a professional look, and it’s easier to control the amount.
Variations & Adaptations
Feel like switching things up? These tender red velvet heart cookies are surprisingly versatile!
- Dietary Variation: For a gluten-free version, swap all-purpose flour with a 1-to-1 gluten-free flour blend. The texture will be slightly different but still delicious.
- Flavor Twist: Add a teaspoon of instant espresso powder to the dough to deepen the cocoa flavor—trust me, it’s a game changer.
- Alternative Frosting: Try a whipped white chocolate ganache instead of cream cheese frosting for a sweeter, silkier finish.
- Seasonal Adaptation: In place of red food coloring, use natural beet powder for a subtle earthy flavor and beautiful color, perfect for springtime treats.
- Method Swap: Instead of rolling and cutting, scoop dough onto baking sheets for soft red velvet drop cookies with rustic charm.
One time, I swapped out half the butter for coconut oil and used coconut cream cheese frosting—everyone loved the tropical twist! Feel free to experiment and find your favorite spin.
Serving & Storage Suggestions
These cookies are best served at room temperature, allowing the cream cheese frosting to be soft and luscious. For a charming presentation, arrange them on a pretty platter with fresh berries or a dusting of powdered sugar. They pair beautifully with a hot cup of coffee, tea, or even a glass of cold milk (you know, for the ultimate cookie experience).
To store, place the cookies in an airtight container and refrigerate for up to 4 days. The frosting stays fresh and creamy, and the cookies maintain their tender texture. If you want to keep them longer, freeze unfrosted cookies in a single layer on a baking sheet until firm, then transfer to a freezer bag for up to 3 months. Thaw at room temperature before frosting.
When reheating frosted cookies, avoid the microwave as the frosting can melt too much. Instead, let them sit out for 15-20 minutes to soften naturally. Over time, the flavors meld beautifully, making these cookies taste even better the next day.
Nutritional Information & Benefits
Each tender red velvet heart cookie with cream cheese frosting contains approximately 220 calories, 10 grams of fat, 30 grams of carbohydrates, and 2 grams of protein. The use of buttermilk and cream cheese adds a nice dose of calcium and vitamin A, while the cocoa powder provides antioxidants that support overall wellness.
This recipe isn’t just a sweet indulgence; it’s made with real ingredients you can feel good about. If you’re mindful of allergens, note that it contains gluten, dairy, and eggs. For those with dietary restrictions, the variations section offers some helpful swaps.
From a personal wellness perspective, I love that this recipe balances indulgence with simplicity—no artificial preservatives, just good, honest ingredients that remind me of home and comfort.
Conclusion
So there you have it—a tender red velvet heart cookies recipe with cream cheese frosting that’s perfect for Valentine’s Day or any time you want to spread a little love. These cookies are easy to make, full of classic flavor, and come together with ingredients you probably already have on hand. The heart shape and cream cheese frosting add a sweet, special touch that makes every bite feel like a celebration.
I encourage you to try this recipe and make it your own—swap in your favorite frosting, add a little twist, or keep it classic and simple. Honestly, I adore these cookies because they bring back warm memories and create new ones every time I bake them. If you give them a try, please drop a comment below sharing your thoughts or any fun variations you’ve tried. And if you loved this recipe, sharing it with your friends would mean the world.
Remember, baking is all about joy and connection—so enjoy every step, and happy Valentine’s Day!
Frequently Asked Questions (FAQs)
Can I make the cookie dough ahead of time?
Yes! You can prepare the dough, wrap it tightly, and refrigerate for up to 48 hours before rolling and baking. This actually helps develop even better flavor and makes rolling easier.
What if I don’t have buttermilk?
No worries! Just mix ½ cup (120ml) milk with 1 teaspoon lemon juice or white vinegar, let it sit for 5 minutes, and use as a buttermilk substitute.
Can I freeze the frosted cookies?
It’s best to freeze unfrosted cookies and add the frosting after thawing to preserve texture and flavor. Frosting can become watery or separate if frozen.
How do I prevent the red color from fading during baking?
Using gel food coloring and adding vinegar helps maintain that vibrant red. Also, avoid overbaking—the cookies should be soft in the center when you take them out.
Can I use a different shape cutter?
Absolutely! While hearts are perfect for Valentine’s Day, you can use any cookie cutter you like. Just remember to adjust the baking time slightly for larger or smaller shapes.
Pin This Recipe!

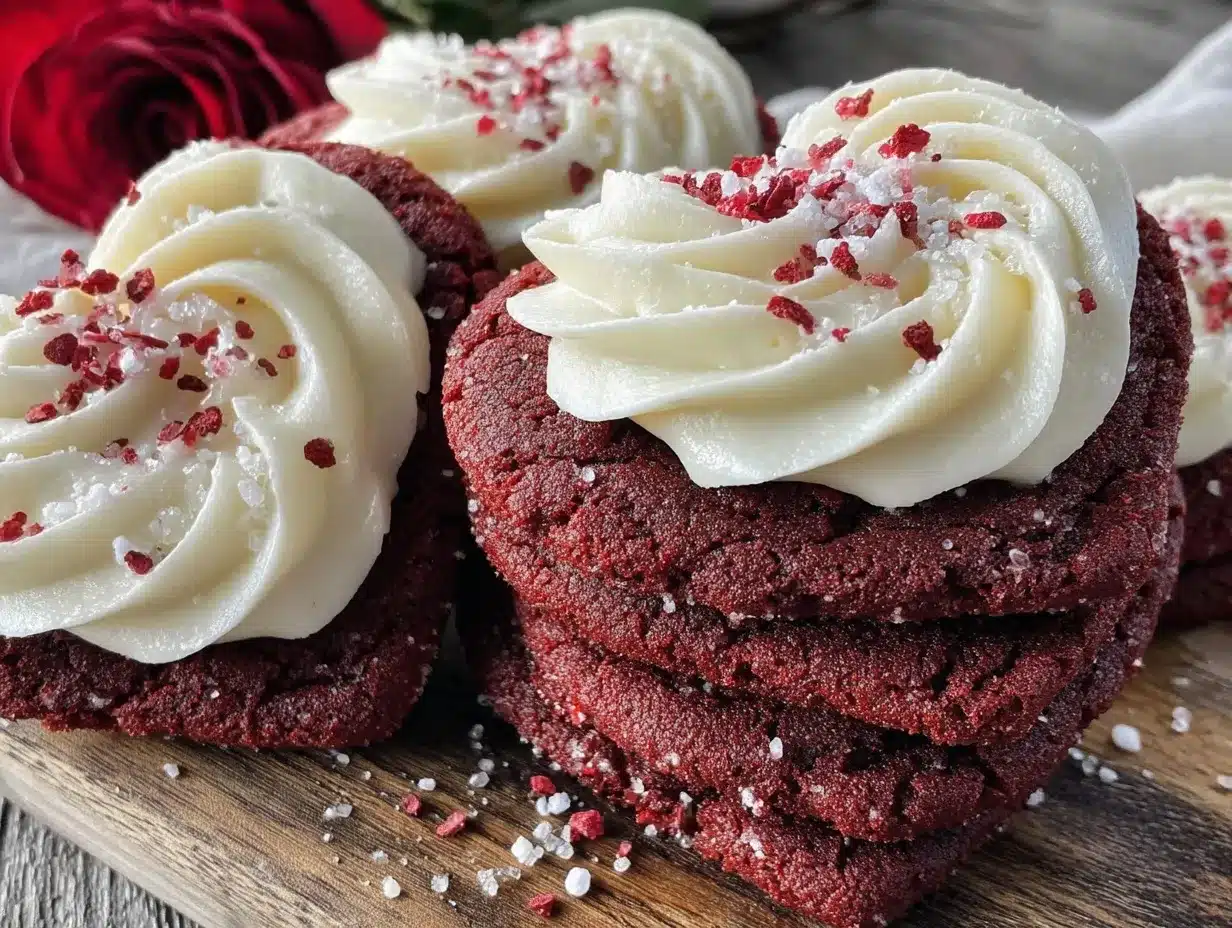
Tender Red Velvet Heart Cookies Recipe with Cream Cheese Frosting

These tender red velvet heart cookies are soft, melt-in-your-mouth treats topped with luscious cream cheese frosting, perfect for Valentine’s Day or any special occasion.
- Prep Time: 20 minutes
- Cook Time: 12 minutes
- Total Time: 42 minutes
- Yield: 24 cookies 1x
- Category: Dessert
- Cuisine: American
Ingredients
- 2 ½ cups all-purpose flour (315g)
- 2 tablespoons unsweetened cocoa powder (15g), preferably Dutch-processed
- ½ teaspoon baking soda
- ¼ teaspoon salt
- ¾ cup unsalted butter (170g), softened
- 1 cup granulated sugar (200g)
- 2 large eggs, room temperature
- ½ cup buttermilk (120ml) or substitute with ½ cup milk + 1 teaspoon lemon juice or white vinegar, let sit 5 minutes
- 1 teaspoon vanilla extract
- 2 tablespoons red gel food coloring
- 1 teaspoon white vinegar
- 8 oz cream cheese (225g), softened
- ½ cup unsalted butter (113g), softened (for frosting)
- 3 cups powdered sugar (360g), sifted
- 1 teaspoon vanilla extract (for frosting)
- Pinch of salt (for frosting)
Instructions
- Preheat your oven to 350°F (175°C). Line two baking sheets with parchment paper and set aside.
- In a medium bowl, sift together the flour, cocoa powder, baking soda, and salt. Set aside.
- In a large bowl, beat the softened butter and granulated sugar on medium speed until light and fluffy, about 3 to 4 minutes.
- Add the eggs one at a time, beating well after each addition.
- Stir in the vanilla extract, red food coloring, and white vinegar.
- With the mixer on low, alternately add the dry ingredients and buttermilk in thirds and halves respectively, beginning and ending with the dry ingredients. Fold gently to avoid overmixing.
- Cover the dough with plastic wrap and refrigerate for at least 30 minutes, up to 2 hours.
- Lightly flour your work surface and roll the dough out to about ¼ inch (6mm) thick.
- Use a 3-inch heart-shaped cookie cutter to cut out cookies and place them about 2 inches (5cm) apart on the prepared baking sheets.
- Bake for 10 to 12 minutes until edges are set but centers remain soft. Avoid overbaking.
- Let cookies cool on the baking sheet for 5 minutes, then transfer to cooling racks to cool completely.
- While cookies cool, beat the softened cream cheese and butter together until smooth and creamy.
- Gradually add sifted powdered sugar, vanilla extract, and a pinch of salt, beating until fluffy and spreadable.
- Once cookies are cool, spread a generous layer of cream cheese frosting on each cookie. Optionally, pipe frosting with a star tip for a neat finish.
Notes
Chill dough for at least 30 minutes to prevent spreading and keep cookies tender. Use gel food coloring and vinegar to maintain vibrant red color. Avoid overmixing to keep cookies soft. If dough is sticky when rolling, chill again for 10 minutes. Frost cookies only after they have completely cooled to prevent melting. For dairy-free or gluten-free versions, see variations section.
Nutrition
- Serving Size: 1 cookie
- Calories: 220
- Sugar: 18
- Sodium: 150
- Fat: 10
- Saturated Fat: 6
- Carbohydrates: 30
- Fiber: 1
- Protein: 2
Keywords: red velvet cookies, heart cookies, cream cheese frosting, Valentine's Day cookies, soft cookies, cocoa cookies, holiday baking