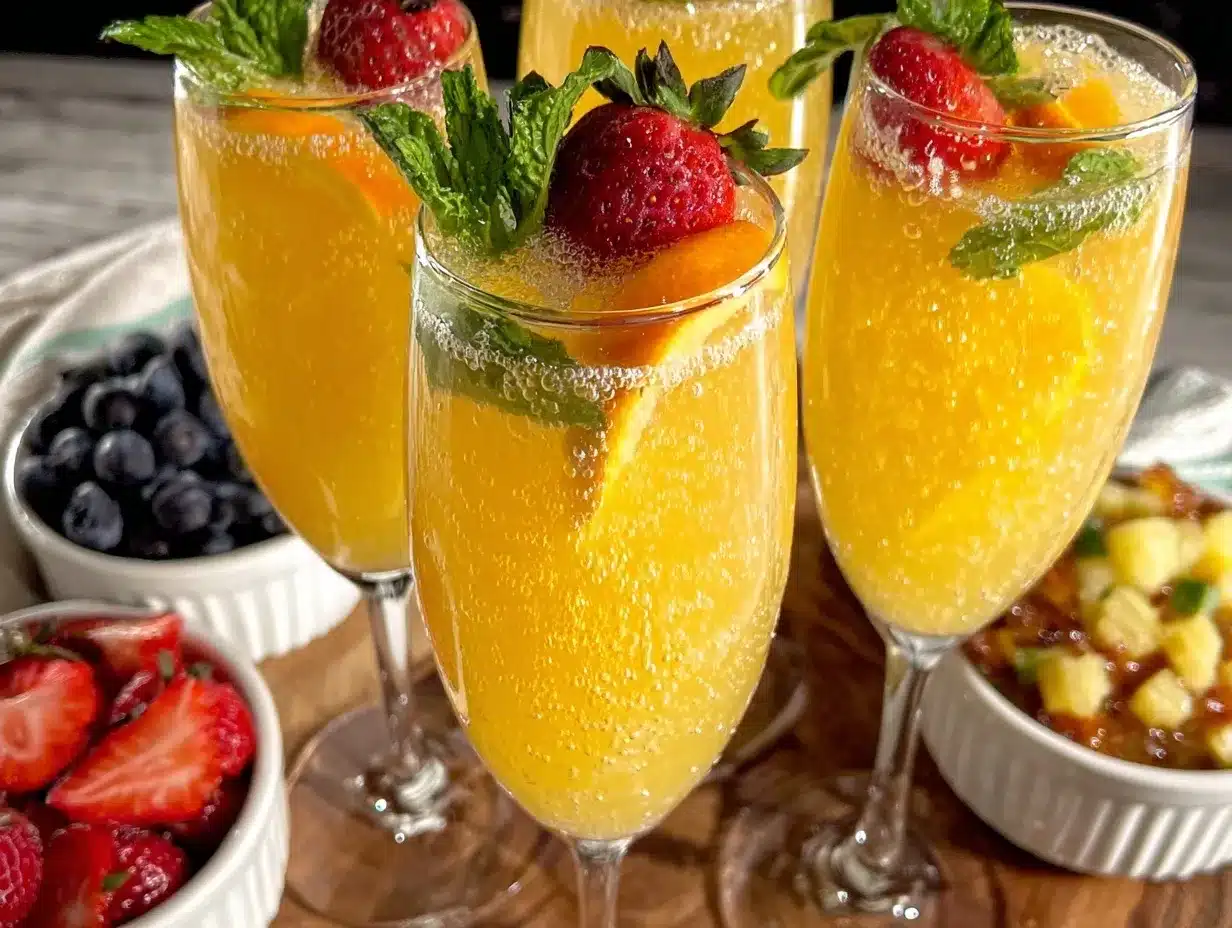
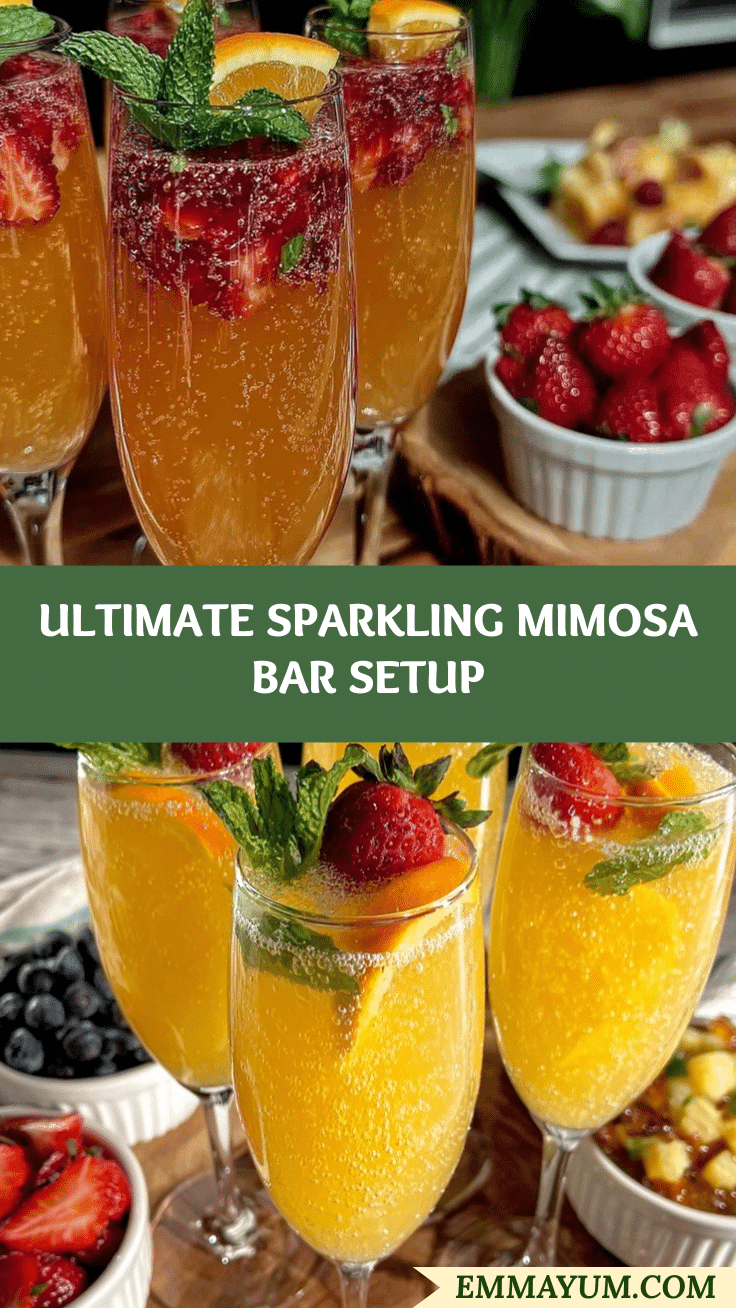
Let me tell you, the sight of a sparkling mimosa bar all set up is enough to make anyone’s heart skip a beat. The glimmer of chilled champagne flutes, colorful fresh fruit, and bubbly orange juice—honestly, it’s like a party waiting to happen before you even take a sip. The first time I put together a mimosa bar for a weekend brunch, I was instantly hooked. It was one of those moments where you pause, take a deep breath, and just smile because you know you’re onto something truly special.
Years ago, when I was knee-high to a grasshopper, family gatherings meant something simple but memorable, and mimosa bars weren’t really a thing yet. I stumbled upon this idea on a rainy weekend while trying to brighten up an otherwise dull day, and boy, do I wish I’d discovered it years ago. My family couldn’t stop sneaking sips and piling fresh berries onto their glasses (and I can’t really blame them). It’s dangerously easy and brings pure, nostalgic comfort to any celebration.
You know what? This Perfect Mimosa Bar Setup Guide is perfect for potlucks, bridal showers, baby announcements, or even just brightening up your Pinterest cookie board with a splash of sparkle. I’ve tested this setup multiple times in the name of research, of course, and it’s become a staple for family gatherings and gifting. You’re going to want to bookmark this one—it feels like a warm hug in a glass.
Why You’ll Love This Recipe
Honestly, setting up a mimosa bar might seem straightforward, but this guide brings a little extra magic to the table. From my experience, a successful mimosa bar isn’t just about pouring champagne and orange juice; it’s about creating an inviting, fun, and stress-free experience for everyone.
- Quick & Easy: The entire setup takes under 30 minutes, perfect for busy hosts or last-minute celebrations.
- Simple Ingredients: No need for complicated cocktails—just fresh, wholesome fruits and bubbly.
- Perfect for Any Occasion: Whether it’s a cozy brunch, holiday morning, or a sparkling celebration, this setup shines.
- Crowd-Pleaser: Kids and adults alike love customizing their drinks with the colorful fruit and mixers.
- Unbelievably Delicious: The combo of fresh ingredients with chilled sparkling wine creates a refreshing, light treat.
This isn’t just another mimosa bar setup. I’ve learned through trial and error that including a mix of fresh and frozen fruits, a variety of juices, and a few fun garnishes makes all the difference. Plus, adding a splash of creativity with unexpected ingredients, like pomegranate seeds or a hint of fresh mint, takes it to the next level. This guide is your best version of a mimosa bar—easy, fun, and memorable.
It’s the kind of setup that makes you close your eyes after the first sip and smile. Perfect for impressing guests without the stress or just making an ordinary day feel a little more special.
What Ingredients You Will Need
This mimosa bar setup uses simple, fresh ingredients that bring bold flavor and festive color without any fuss. Most are pantry staples or easy to find at your local market.
- Champagne or Sparkling Wine: Brut or extra dry works best for a crisp finish. I prefer La Marca for its balanced bubbles and approachable flavor.
- Orange Juice: Freshly squeezed is ideal for vibrant flavor, but high-quality store-bought juice works fine in a pinch.
- Other Juices:
- Cranberry juice (adds a tart punch)
- Pineapple juice (for tropical flair)
- Pomegranate juice (rich color and antioxidants)
- Fresh Fruit Garnishes:
- Strawberries, hulled and sliced
- Blueberries
- Pineapple chunks
- Raspberries
- Orange slices or twists (great for zest and aroma)
- Herbs & Extras:
- Fresh mint leaves (adds a refreshing note)
- Pomegranate seeds (for crunch and color)
- Edible flowers (optional, for a pretty touch)
- Optional Sweeteners: Simple syrup or honey to offer a touch of extra sweetness for those who like it.
If you want to switch things up, frozen berries are a great alternative that also help keep drinks chilled longer. For a low-sugar twist, try sparkling water mixed with juice instead of champagne. For a gluten-free option, all sparkling wines and juices listed are naturally gluten-free.
Equipment Needed
- Champagne flutes or tall glasses: The classic vessel for mimosas. If you don’t have flutes, a wine glass or even a pretty tumbler works.
- Pitchers or dispensers: For juices and sparkling wine. Glass pitchers with spouts are ideal for easy pouring.
- Spoons and tongs: For scooping fruit garnishes—small tongs are my favorite for neatness and ease.
- Cutting board and sharp knife: To prep fruit garnishes quickly and safely.
- Ice bucket or cooler: To keep sparkling wine chilled during the event.
If you don’t own a fancy ice bucket, a large bowl filled with ice works just fine (trust me, I’ve used everything from ceramic bowls to salad tubs). For budget-friendly options, thrift stores often have elegant glassware at a steal. Keeping tools clean and polished helps your setup look extra inviting, so I recommend a quick rinse and dry before guests arrive.
Preparation Method
- Chill all beverages and glasses: Place champagne and juices in the fridge for at least 2 hours before your event (or overnight if possible). Chill glasses in the freezer for about 15 minutes just before serving. This keeps drinks icy cold and refreshing.
- Prep fruit garnishes: Wash all fresh fruit thoroughly. Hull and slice strawberries, slice oranges into thin rounds or twists, and cut pineapple into bite-sized chunks. Place each fruit variety in separate bowls or small platters for easy access. If using mint, rinse and gently pat dry.
- Set up the bar area: Arrange pitchers or dispensers with sparkling wine and different juices at one end of the table. Place glasses nearby, followed by bowls of fruit garnishes and herbs. Lay out spoons and tongs for guests to serve themselves.
- Create labels (optional): For a polished look, label each juice and garnish. You can use small chalkboard signs, handwritten tags, or printed cards. This helps guests mix and match with confidence.
- Offer simple syrups or sweeteners: Place a small bowl or bottle of simple syrup or honey with a spoon or dropper for those who like their mimosa a bit sweeter.
- Prepare ice bucket or cooler: Fill with ice and place bottles of champagne or sparkling wine inside to keep chilled throughout the celebration.
- Final touches: Add edible flowers or scatter extra fresh mint leaves on the table for a festive and inviting vibe. Light candles nearby to enhance the ambiance if it’s an evening event.
- Invite guests to assemble their mimosas: Encourage them to start with a splash of juice, add sparkling wine slowly, and finish with a garnish or two. Remind them to sip slowly and savor the moment!
Keep in mind, if you notice the sparkling wine foaming up too much while pouring, pour slowly down the side of the glass to preserve those precious bubbles. Also, prepping fruit the day before and storing in airtight containers helps save time on the day of your event.
Cooking Tips & Techniques
Setting up a mimosa bar sounds easy, but some little tricks make all the difference.
- Chill everything well: Warm glasses or room temperature champagne can kill the fizz fast. Trust me, I learned this the hard way when my first batch went flat in minutes.
- Pour sparkling wine carefully: Tilt your glass and pour slowly against the side to keep bubbles intact and avoid overflow.
- Balance sweetness: Offering different juice options helps guests find their perfect mix. Too sweet or too tart? A splash of sparkling water can tone things down.
- Pre-cut fruit evenly: Uniform slices not only look prettier but make it easier for guests to grab and use.
- Keep fruit cold: Fresh fruit can lose shape and flavor if left out too long. Rotate or replenish bowls as needed.
- Be mindful of glassware: I’ve found that thinner glasses enhance the drinking experience, but sturdy flutes are safer for outdoor events.
- Set up a trash or compost bin nearby: Guests appreciate a place to discard stems or peels without wandering off.
Timing is key—set up your mimosa bar about 20-30 minutes before guests arrive to keep everything fresh and bubbly. Multitasking by prepping fruit while chilling beverages saves precious minutes and keeps stress low.
Variations & Adaptations
Want to mix things up? Here are some easy ways to customize your mimosa bar:
- Non-alcoholic option: Use sparkling water or non-alcoholic sparkling wine with the same fresh juices and garnishes for a festive mocktail bar.
- Seasonal fruits: Swap in seasonal favorites like peach slices in summer or pomegranate seeds and blood oranges in winter to keep things fresh and exciting.
- Flavor twists: Add a splash of elderflower liqueur or a few drops of bitters for a subtle complexity that guests will love.
- Spicy touch: Try including jalapeño slices or a cinnamon stick as garnish for those who like a little heat and warmth in their drinks.
- Personal favorite: I once served a mimosa bar with frozen mango chunks and a dash of fresh lime juice—it was a tropical hit that guests kept talking about!
For cooking method adaptations, you can prepare a batch of mimosa cocktail mix in pitchers for quicker serving, but I recommend keeping some ingredients separate so guests can personalize their drinks.
Serving & Storage Suggestions
Serve mimosas chilled—nothing beats the crisp, refreshing sensation of a cold glass on a sunny morning or a crisp evening. Presentation-wise, arrange glasses in neat rows or clusters with fruit bowls in between for easy reach.
Pair your mimosa bar with light bites such as fresh pastries, cheese boards, or fruit platters to complement the bright flavors.
If you have leftovers, store unopened sparkling wine bottles upright in the fridge. Once opened, use a champagne stopper and drink within 1-2 days to keep bubbles lively. Juice leftovers can be refrigerated for up to 3 days but always give a sniff test first.
Reheat mimosas? Not really recommended—best to enjoy fresh. However, you can prep fruit garnishes in airtight containers a day ahead to save time.
Flavors actually mellow and blend beautifully if you let your mimosa sit for a few minutes before drinking—just don’t wait too long, or bubbles disappear!
Nutritional Information & Benefits
A mimosa is a relatively light cocktail, typically containing about 80-100 calories per serving depending on the juice and sparkling wine used. Key ingredients like fresh orange juice provide a good dose of vitamin C and antioxidants.
Choosing fresh fruit garnishes adds fiber and nutrients, making your celebration a little healthier too. Opting for brut or extra dry sparkling wines keeps sugar content lower.
This setup is naturally gluten-free and can be adapted for dairy-free, vegan, or low-sugar diets with simple swaps such as using sparkling water or sugar-free juices.
From a wellness perspective, mimosas offer a moderate indulgence that pairs well with mindful eating—enjoy responsibly and savor the experience.
Conclusion
So there you have it—the Perfect Mimosa Bar Setup Guide that brings sparkle, fun, and flavor to any celebration. Whether you’re hosting a casual brunch, a big party, or just want to treat yourself on a lazy weekend, this setup makes it easy to impress without the stress. Customize it with your favorite juices, fruits, and garnishes to make it truly your own.
I love this mimosa bar because it’s not only delicious but also brings people together in a lighthearted, joyful way. I hope it becomes a staple in your gatherings like it has in mine. Don’t forget to share your own twists or successes—I’m always eager to hear how you make it shine!
Go ahead, try it out, and let the sparkling celebrations begin!
FAQs
What kind of sparkling wine is best for a mimosa bar?
Brut or extra dry sparkling wines work best because they offer a crisp, balanced flavor that pairs nicely with fruit juices. Prosecco and Cava are budget-friendly and tasty options.
Can I prepare the mimosa bar the night before?
Prep fruit and chill beverages the night before, but set up the bar and arrange glasses shortly before guests arrive to keep everything fresh and bubbly.
What are some good non-alcoholic mimosa alternatives?
Use sparkling water, non-alcoholic sparkling wines, or even flavored seltzers mixed with fresh juice to create festive mocktails that everyone can enjoy.
How do I keep sparkling wine from going flat during the party?
Chill bottles well, use a champagne stopper after opening, and pour slowly down the side of glasses to preserve bubbles longer.
What fruits work best as mimosa garnishes?
Strawberries, blueberries, raspberries, orange slices, pineapple chunks, and pomegranate seeds are all excellent choices that add color, flavor, and texture.
Pin This Recipe!
Perfect Mimosa Bar Setup Guide
A guide to setting up a sparkling mimosa bar with fresh fruits, juices, and bubbly for any celebration. Easy, fun, and customizable for guests.
- Prep Time: 15 minutes
- Cook Time: 0 minutes
- Total Time: 30 minutes
- Yield: Varies (serves multiple guests)
- Category: Beverage
- Cuisine: American
Ingredients
- Champagne or Sparkling Wine (Brut or extra dry)
- Orange Juice (freshly squeezed or high-quality store-bought)
- Cranberry juice
- Pineapple juice
- Pomegranate juice
- Strawberries, hulled and sliced
- Blueberries
- Pineapple chunks
- Raspberries
- Orange slices or twists
- Fresh mint leaves
- Pomegranate seeds
- Edible flowers (optional)
- Simple syrup or honey (optional sweeteners)
Instructions
- Chill all beverages and glasses: Place champagne and juices in the fridge for at least 2 hours before your event (or overnight if possible). Chill glasses in the freezer for about 15 minutes just before serving.
- Prep fruit garnishes: Wash all fresh fruit thoroughly. Hull and slice strawberries, slice oranges into thin rounds or twists, and cut pineapple into bite-sized chunks. Place each fruit variety in separate bowls or small platters for easy access. If using mint, rinse and gently pat dry.
- Set up the bar area: Arrange pitchers or dispensers with sparkling wine and different juices at one end of the table. Place glasses nearby, followed by bowls of fruit garnishes and herbs. Lay out spoons and tongs for guests to serve themselves.
- Create labels (optional): For a polished look, label each juice and garnish with small chalkboard signs, handwritten tags, or printed cards.
- Offer simple syrups or sweeteners: Place a small bowl or bottle of simple syrup or honey with a spoon or dropper for those who like their mimosa a bit sweeter.
- Prepare ice bucket or cooler: Fill with ice and place bottles of champagne or sparkling wine inside to keep chilled throughout the celebration.
- Add final touches: Add edible flowers or scatter extra fresh mint leaves on the table for a festive and inviting vibe. Light candles nearby to enhance ambiance if it’s an evening event.
- Invite guests to assemble their mimosas: Encourage them to start with a splash of juice, add sparkling wine slowly, and finish with a garnish or two. Remind them to sip slowly and savor the moment.
Notes
Chill all beverages and glasses well to keep drinks refreshing and bubbly. Pour sparkling wine slowly down the side of the glass to preserve bubbles. Pre-cut fruit evenly and keep fruit cold to maintain freshness. Prepare fruit the day before and store in airtight containers to save time. Use a champagne stopper to keep opened bottles bubbly. Offer a variety of juices and sweeteners to balance sweetness and tartness.
Nutrition
- Serving Size: 1 mimosa cocktail (a
- Calories: 80100
- Sugar: 58
- Sodium: 5
- Carbohydrates: 610
- Fiber: 12
Keywords: mimosa bar, sparkling wine, brunch drinks, celebration drinks, fresh fruit cocktails, easy mimosa, party drinks