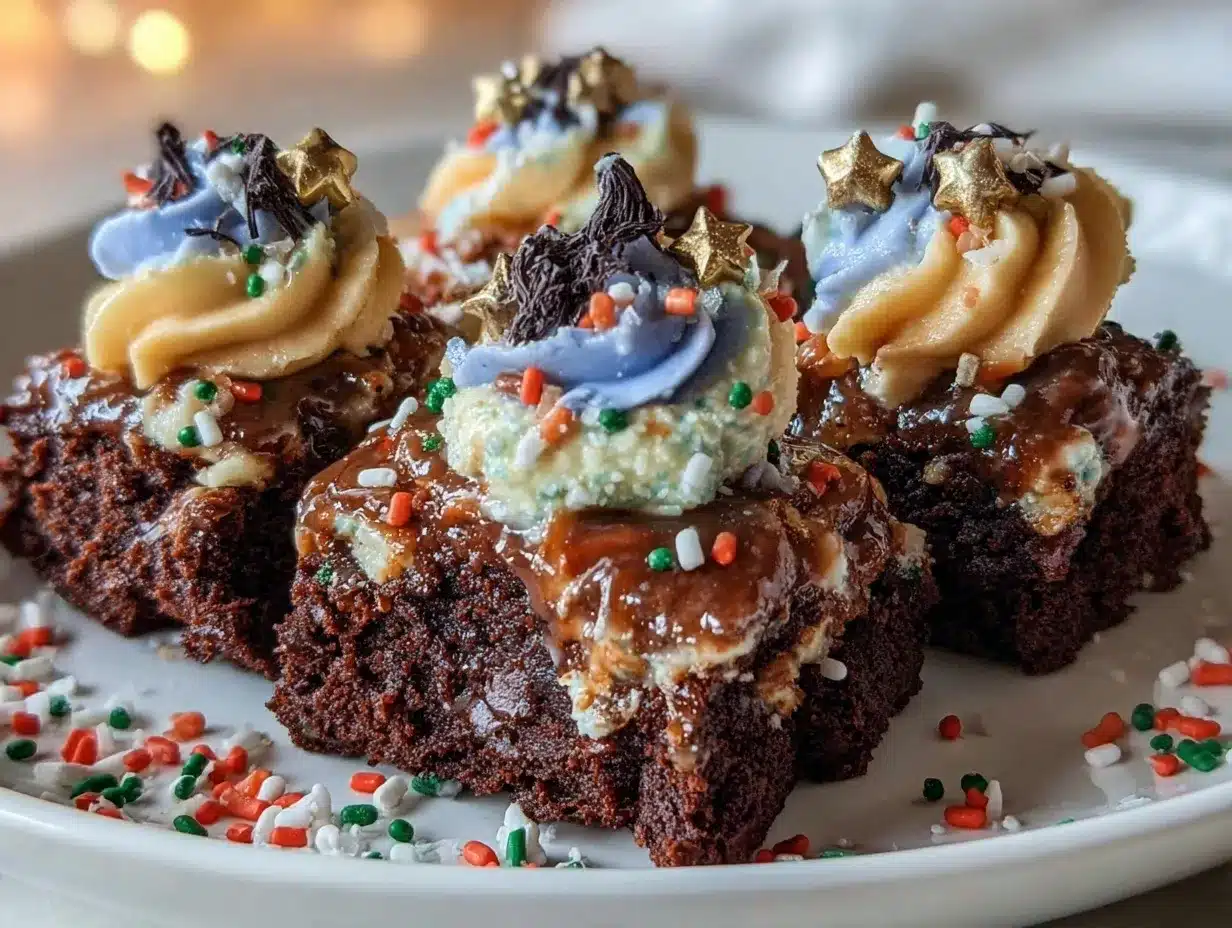
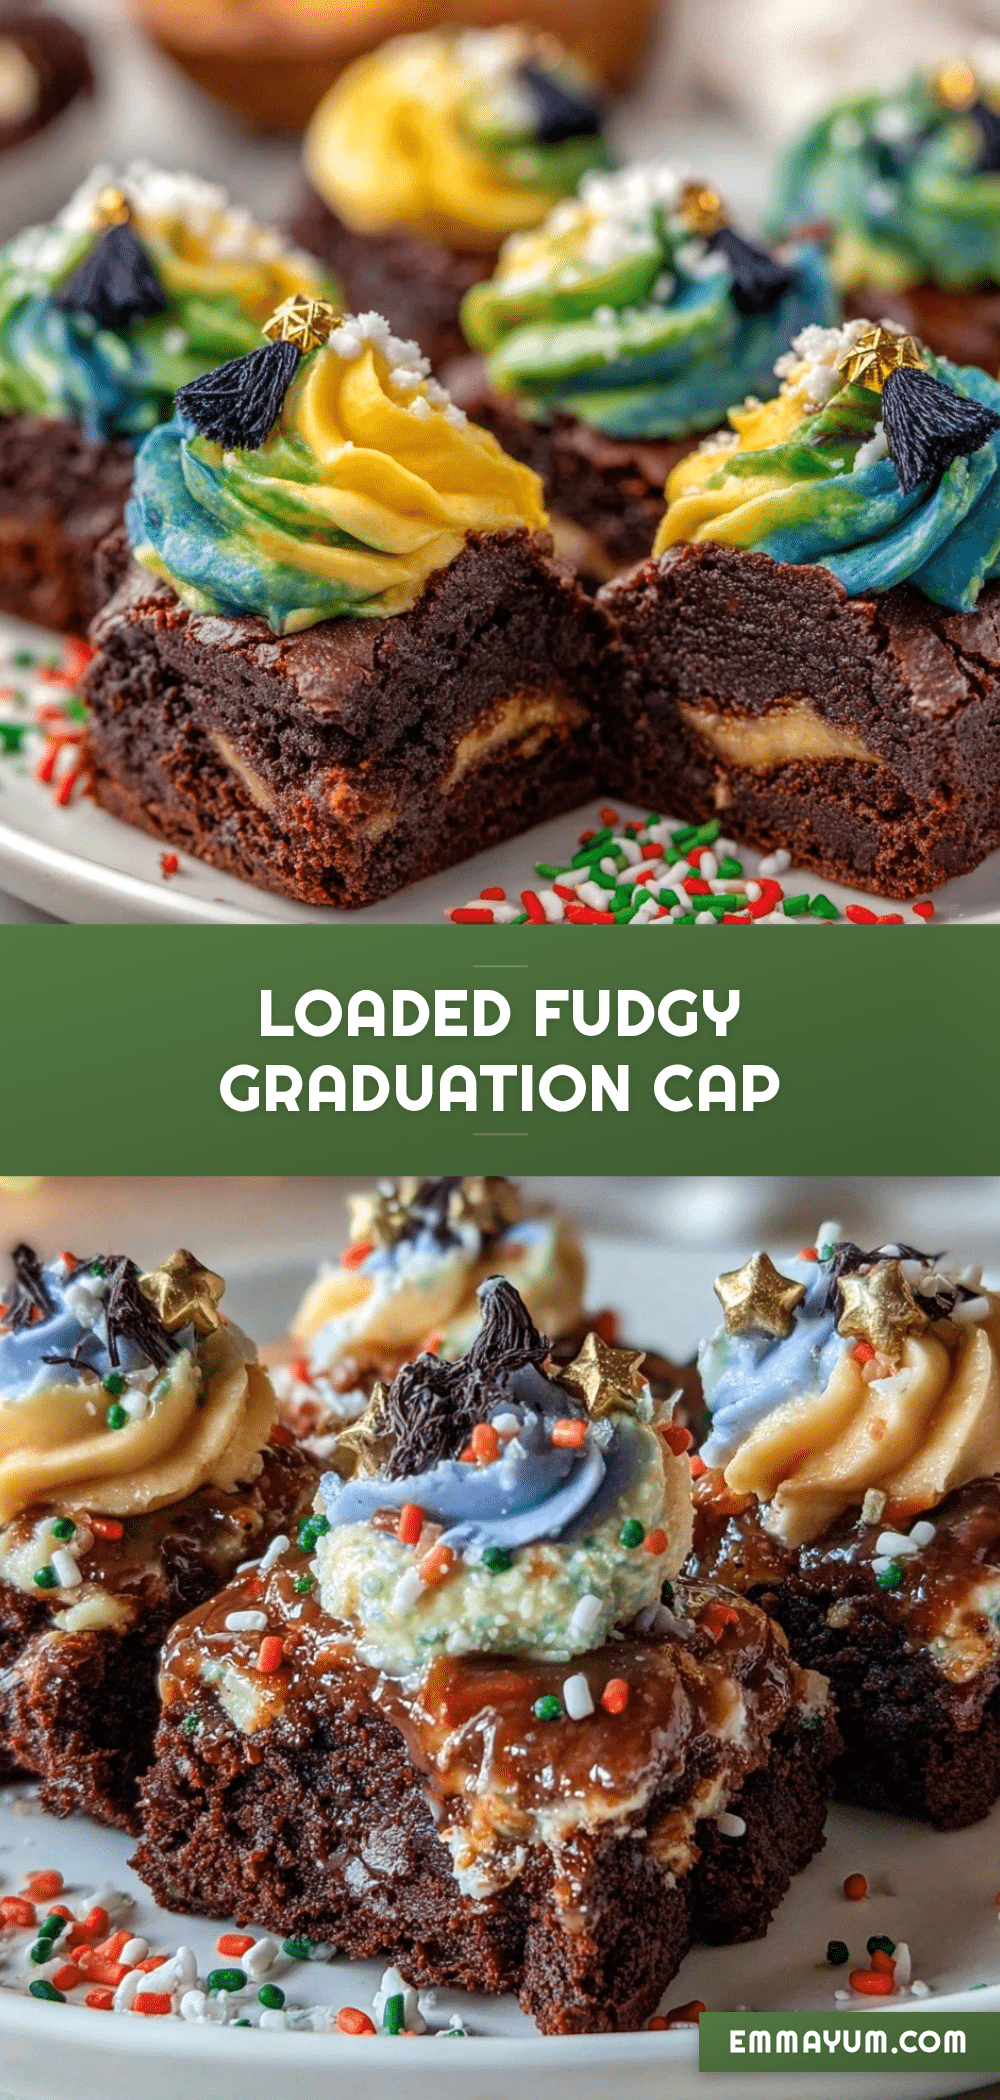
“Hey, did you see the treats at the graduation party?” my friend texted me just as I was wiping frosting off my hands from an earlier baking experiment. Honestly, I wasn’t expecting much from a last-minute idea tossed together with leftover brownie mix and a handful of colorful candies. But those Perfect Loaded Graduation Cap Brownie Bites turned out to be the surprise hit of the celebration. The way the rich chocolate mingled with gooey melted toppings and that playful graduation cap design made everyone, from kids to adults, pause and smile.
That afternoon, my kitchen felt like a whirlwind—half chaos, half magic—as I wrestled with frosting piping bags and debated over candy arrangements. These little bites weren’t planned for days or perfected after dozens of tries; they came from a spur-of-the-moment spark, a practical solution when I needed a festive treat fast but still wanted to impress. You know how it goes—sometimes the best recipes are born out of those slightly frantic, “make it work” moments.
What stuck with me wasn’t just how easy they were to whip up, but how they captured the joy and accomplishment of the day, making a simple brownie feel special without fuss. Those Loaded Graduation Cap Brownie Bites have since become my go-to for celebrations, a sweet reminder that sometimes the simplest ideas bring the biggest smiles.
Why You’ll Love This Recipe
After making these Perfect Loaded Graduation Cap Brownie Bites more times than I can count (yes, I went through a serious obsession phase!), I’ve gathered a few reasons they’ll quickly become your favorite celebration treat:
- Quick & Easy: You can have these ready in under 30 minutes, which is perfect when last-minute party plans sneak up on you.
- Simple Ingredients: No need to hunt for anything fancy—basic pantry staples plus a few fun toppings, so no stress grocery runs.
- Perfect for Celebrations: Whether it’s graduation, birthdays, or any joyful event, these bites bring that festive vibe without the fuss.
- Crowd-Pleaser: Kids especially love the colorful caps, but adults aren’t far behind—everyone asks for seconds.
- Unbelievably Delicious: The chewy brownie base combined with melty chocolate and crunchy candy toppings hits all the right texture notes.
What sets this recipe apart is the little twist of using mini marshmallows and candy melts to craft the graduation caps—it’s a fun, hands-on step that adds personality to each bite. Plus, blending a few chocolate chips into the batter adds a richer, fudgier bite that you won’t find in your average brownie recipe. Honestly, it’s like your classic brownies got a festive upgrade, making them perfect for impressing guests without breaking a sweat. This recipe isn’t just a snack; it’s a celebration in every bite.
What Ingredients You Will Need
This recipe keeps things straightforward and fun. The ingredients come together to create that chewy, chocolatey base with playful toppings that mimic graduation caps—simple but effective!
- For the Brownie Batter:
- 1/2 cup (115g) unsalted butter, melted (adds richness)
- 1 cup (200g) granulated sugar
- 2 large eggs, room temperature
- 1 teaspoon vanilla extract
- 1/3 cup (35g) unsweetened cocoa powder (choose a good-quality brand like Hershey’s for deeper flavor)
- 1/2 cup (65g) all-purpose flour
- 1/4 teaspoon salt
- 1/4 teaspoon baking powder
- 1/2 cup (90g) semi-sweet chocolate chips (optional but recommended for extra fudginess)
- For the Graduation Cap Toppings:
- Mini marshmallows (for the cap’s mortarboard base)
- Black candy melts or black icing (to create the cap’s top)
- Edible gold or yellow sprinkles (for the tassel)
- Colored candy-coated chocolates or small candies (optional decorations)
All of these ingredients are pretty common, but if you want to make it gluten-free, swapping the all-purpose flour for a 1:1 gluten-free flour blend works well. For dairy-free versions, coconut oil can stand in for butter, and you can find dairy-free chocolate chips at most grocery stores. I like to use mini marshmallows from brands like Dandies if I’m avoiding gelatin. If fresh berries are in season, tossing a few inside the batter gives a surprising fruity twist, though it’s not traditional.
Equipment Needed
- Mixing bowls (one large, one medium)
- Measuring cups and spoons (accuracy matters here!)
- Electric hand mixer or whisk
- 8×8-inch (20×20 cm) baking pan
- Non-stick spray or parchment paper (to line the pan)
- Small offset spatula or butter knife (for spreading batter evenly)
- Piping bag or small zip-top bag (for applying candy melts or icing)
- Toothpicks (helpful for tiny detailing on the caps)
If you don’t have an electric mixer, a sturdy whisk works fine, but it’ll take a bit more elbow grease. I’ve found that parchment paper liners make cleanup a breeze, especially when working with sticky brownie batter. For decorating, if piping bags aren’t in your drawer, a simple zip-top bag with a tiny corner snipped off does the job just as well. And if you plan on making these often, a silicone spatula is a worthy investment for scraping every bit of batter.
Preparation Method
- Preheat the Oven and Prepare Pan: Set your oven to 350°F (175°C). Grease your 8×8-inch pan or line it with parchment paper for easy release. This step takes about 5 minutes but saves headaches later.
- Mix Wet Ingredients: In a large bowl, combine the melted butter and sugar. Stir well until slightly glossy, then whisk in the eggs one at a time, followed by the vanilla extract. This should take around 3-4 minutes. The mixture will thicken and look smooth.
- Add Dry Ingredients: Sift together the cocoa powder, flour, salt, and baking powder in a separate bowl. Gradually fold this into the wet ingredients, being careful not to overmix—about 30 seconds of gentle folding is enough. If using, stir in the chocolate chips now for that extra fudgy texture.
- Bake the Brownies: Pour the batter into your prepared pan and spread evenly using an offset spatula. Slide it into the oven and bake for 20-25 minutes. You want the brownies to be set but still fudgy inside—check by inserting a toothpick; a few moist crumbs are perfect. Remove from oven and let cool completely, about 30 minutes.
- Create the Graduation Cap Bites: Once cooled, cut the brownies into bite-sized squares (about 1.5 inches or 4 cm). Place a mini marshmallow on top of each square as the base for the mortarboard. Melt the black candy melts according to package instructions and pipe a small square on top of the marshmallow to form the cap’s flat top. Use edible gold sprinkles or a tiny line of yellow icing to add the tassel detail. This decorating step takes patience but turns out adorable. If you want a fun twist, add a colored candy “button” in the center of the cap.
Tip: If the candy melts start to harden while decorating, just pop them back in the microwave for 10-15 seconds to soften again. The key sensory cue here is that the brownies should feel firm but moist, and the frosting or candy melts should set quickly once applied. This method keeps the bites looking neat and festive.
Cooking Tips & Techniques
Getting these Loaded Graduation Cap Brownie Bites just right is easier with a few tricks I learned the hard way. First off, don’t overbake the brownies. You want that fudgy center, not dry crumbs—so keeping a close eye in the last 5 minutes is crucial.
When folding dry ingredients into the wet mix, slow and gentle beats the rush. Overmixing activates gluten in the flour, resulting in tougher brownies, and nobody wants that on a celebratory treat. Also, letting the brownies cool fully before cutting prevents crumbly edges and messy decorations.
For the mortarboard caps, patience is everything. Melt your candy melts slowly—too hot, and they’ll be runny; too cool, and they won’t pipe smoothly. Using a toothpick to guide the tassel detail makes a big difference in control.
Multitasking tip: While brownies bake, prep your toppings and melt the candy melts so you’re ready to decorate as soon as the brownies cool. This keeps the momentum going and the treats fresh.
Finally, if you want to save time, you can bake the brownies a day ahead and store them airtight at room temperature. Just decorate right before serving to keep the candy melts intact.
Variations & Adaptations
These brownie bites are surprisingly versatile. Here are some ways to switch things up depending on your occasion or dietary needs:
- Gluten-Free Version: Swap the all-purpose flour for a gluten-free blend like Bob’s Red Mill 1-to-1 gluten-free flour. The texture stays fudgy and delicious.
- Nutty Twist: Fold chopped toasted pecans or walnuts into the batter for crunch and depth. I added walnuts once, and it gave the bites a nice earthy contrast to the sweetness.
- Peanut Butter Caps: Instead of candy melts, use a dollop of peanut butter on the marshmallow base, topped with mini chocolate chips to form the cap. This adds a rich, salty-sweet combo.
- Dairy-Free Option: Use coconut oil instead of butter and choose dairy-free chocolate chips and marshmallows. The flavor stays rich, and everyone can enjoy.
- Seasonal Flavors: For spring or summer graduations, mix freeze-dried raspberry powder into the batter or swap the chocolate chips for white chocolate chunks to brighten the flavors.
I once made a batch with a dash of espresso powder stirred into the batter—it gave a subtle mocha hint that was a hit at a coffee-loving friend’s party. Feel free to get creative and make these bites your own!
Serving & Storage Suggestions
These Perfect Loaded Graduation Cap Brownie Bites shine best served at room temperature so the chocolate and toppings stay soft but firm. Arrange them on a festive platter with some colorful paper liners for a polished look.
They pair beautifully with a cold glass of milk or a cup of rich coffee, making them a perfect afternoon pick-me-up during celebrations. If you’re planning a party, consider complementing these bites with other crowd favorites like easy no-churn cookies and cream ice cream for a sweet and creamy combo.
Store leftovers in an airtight container at room temperature for up to 3 days. For longer storage, freeze the brownie bites (undecorated) wrapped tightly in plastic wrap and foil—thaw completely before decorating and serving. Reheating isn’t necessary and can cause the candy melts to lose their shape.
Pro tip: The flavors deepen if you let the brownies sit for a few hours, so if you can prepare them in advance, they taste even better the next day.
Nutritional Information & Benefits
Each loaded brownie bite (makes about 24) roughly contains 120 calories, 6 grams of fat, and 15 grams of carbs. Key ingredients like cocoa powder provide antioxidants, while the mini marshmallows and candy toppings, though sugary, add that festive fun.
For those watching dietary needs, the recipe is flexible enough to accommodate gluten-free and dairy-free swaps without losing the fudgy, rich texture. While these treats are definitely sweet indulgences, they’re perfect for celebrating milestones with balanced portions.
From a wellness perspective, making these at home means you control ingredients—no preservatives or artificial flavors—just pure joyful bites for your celebration table.
Conclusion
Perfect Loaded Graduation Cap Brownie Bites are more than just a dessert—they’re a little celebration on their own. They bring together simple ingredients, easy prep, and festive charm in a way that makes any graduation feel extra special. I love how customizable they are, letting you add your personal touch while still keeping things approachable.
Whether you’re a seasoned baker or just looking for a quick, fun project, these bites offer a sweet win. So grab your mixing bowl, and have a little fun with it—you’ll soon understand why these treats keep showing up at my parties.
If you try making them, I’d love to hear how you decorated your caps or any unique twists you added. Sharing those moments makes the recipe even better!
FAQs
Can I use a boxed brownie mix for this recipe?
Absolutely! Boxed brownie mix works fine if you’re short on time. Just follow the package instructions for the batter and then decorate as described for the graduation caps.
How do I store these brownie bites if I’m making them ahead?
Store undecorated brownies in an airtight container at room temperature for up to 3 days. Freeze if you want to keep them longer, but decorate right before serving to keep the candy melts looking fresh.
What can I use instead of candy melts?
You can use black icing, melted chocolate chips with a touch of vegetable oil, or even black fondant if you’re comfortable working with it. Just make sure it hardens well to hold the cap shape.
Can I make these vegan?
Yes! Use vegan butter or coconut oil, dairy-free chocolate chips, and vegan marshmallows. Check ingredient labels to ensure everything fits your dietary preferences.
Any tips for decorating the tassels neatly?
Using a toothpick or a small piping tip to draw the tassel helps keep it precise. Practice on parchment paper first if you’re nervous—it’s easier than you think!
Pin This Recipe!
Loaded Graduation Cap Brownie Bites
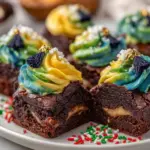
These Loaded Graduation Cap Brownie Bites are quick, easy, and perfect for celebrations. They feature a fudgy brownie base topped with playful graduation cap decorations made from mini marshmallows and candy melts.
- Prep Time: 10 minutes
- Cook Time: 25 minutes
- Total Time: 65 minutes
- Yield: 24 servings 1x
- Category: Dessert
- Cuisine: American
Ingredients
- 1/2 cup (115g) unsalted butter, melted
- 1 cup (200g) granulated sugar
- 2 large eggs, room temperature
- 1 teaspoon vanilla extract
- 1/3 cup (35g) unsweetened cocoa powder
- 1/2 cup (65g) all-purpose flour
- 1/4 teaspoon salt
- 1/4 teaspoon baking powder
- 1/2 cup (90g) semi-sweet chocolate chips (optional)
- Mini marshmallows
- Black candy melts or black icing
- Edible gold or yellow sprinkles
- Colored candy-coated chocolates or small candies (optional)
Instructions
- Preheat the oven to 350°F (175°C). Grease an 8×8-inch baking pan or line it with parchment paper.
- In a large bowl, combine melted butter and sugar. Stir until slightly glossy, then whisk in eggs one at a time followed by vanilla extract until smooth.
- In a separate bowl, sift together cocoa powder, flour, salt, and baking powder. Gradually fold into wet ingredients gently to avoid overmixing. Stir in chocolate chips if using.
- Pour batter into prepared pan and spread evenly with an offset spatula. Bake for 20-25 minutes until brownies are set but still fudgy (a toothpick should come out with a few moist crumbs). Let cool completely, about 30 minutes.
- Cut cooled brownies into 1.5-inch squares. Place a mini marshmallow on each square as the mortarboard base. Melt black candy melts and pipe a small square on top of each marshmallow to form the cap. Add edible gold sprinkles or yellow icing for tassel detail. Optionally, add a colored candy ‘button’ on the cap.
Notes
Do not overbake to keep brownies fudgy. Let brownies cool completely before cutting and decorating. If candy melts harden while decorating, soften in microwave for 10-15 seconds. You can bake brownies a day ahead and decorate just before serving. For gluten-free, substitute flour with 1:1 gluten-free blend. For dairy-free, use coconut oil and dairy-free chocolate chips and marshmallows.
Nutrition
- Serving Size: 1 brownie bite (abou
- Calories: 120
- Fat: 6
- Carbohydrates: 15
Keywords: brownie bites, graduation treats, celebration dessert, easy brownies, chocolate brownies, party snacks