“I wasn’t expecting cooking advice from my plumber,” I said, wiping flour off my hands, “but there I was, watching him fix my sink while he told me about his grandmother’s secret for the crispiest chicken tenders.” It was a damp Thursday afternoon—one of those days where nothing seemed to go right. The power had flickered twice, I’d forgotten the eggs for breakfast, and the kitchen was a mess. Yet, amidst all that chaos, the idea of crispy oven-fried buttermilk chicken tenders simmered in my mind like a quiet promise.
The sizzle of chicken hitting a hot pan is one thing, but the crunch you get from oven-frying instead? That’s a different story. It was a bit of a happy accident, honestly. I was aiming for classic fried tenders but was pressed for time and wary of the mess. So, I tried baking them, and let me tell you, the results blew me away. The golden crust had that irresistible crunch, and the inside stayed juicy and tender. I remember cracking a bowl in my rush, and my neighbor, Mrs. Carlson, peeking over the fence just as I pulled the tray from the oven, asking, “What smells so good?”
Maybe you’ve been there—looking for that perfect homemade crunch without the deep-fried aftermath. This recipe stuck with me because it’s simple, fuss-free, and honestly, a little bit addictive. I keep making these crispy oven-fried buttermilk chicken tenders whenever I want comfort food that feels like a treat but doesn’t derail the whole evening. So, if you’re ready to bring a crunchy, juicy twist to your dinner table, let’s dig in.
Why You’ll Love This Recipe
After countless trials in my kitchen, this crispy oven-fried buttermilk chicken tenders recipe quickly became a go-to for busy nights and casual get-togethers. Here’s why it stands out:
- Quick & Easy: Comes together in under 40 minutes, perfect for last-minute cravings or weeknight dinners.
- Simple Ingredients: No fancy trips needed—you probably have these staples already: buttermilk, basic spices, and chicken tenders.
- Perfect for Any Occasion: Whether it’s a laid-back movie night or a crowd-pleasing appetizer at your next potluck, these tenders shine.
- Crowd-Pleaser: Kids, adults, picky eaters—they all ask for seconds. The texture and flavor combo is just right.
- Unbelievably Delicious: Thanks to a secret step of marinating in buttermilk and a double coating, you get that homemade crunch without frying.
This isn’t just another oven-baked chicken recipe. The buttermilk marinade tenderizes the meat and adds a subtle tang that cuts through the crispy coating perfectly. Plus, the light hands-on technique means less oil, less mess, and a whole lot of satisfaction. Honestly, this recipe makes me want to close my eyes with that first bite because it’s comfort food done right—crispy, juicy, and full of soul.
What Ingredients You Will Need
This recipe uses simple, wholesome ingredients to deliver bold flavor and that satisfying crunch without fuss. Most are pantry staples or easy to find at your local store.
- Chicken Tenders: About 1.5 pounds (680g), trimmed of excess fat. I like using fresh, never frozen tenders for the best texture.
- Buttermilk: 1 cup (240ml) for marinating. It tenderizes and adds tang. You can use store-bought or homemade (milk + vinegar).
- All-Purpose Flour: 1 cup (120g) for the first coating layer. Bob’s Red Mill is a brand I trust for consistent texture.
- Breadcrumbs: 1.5 cups (150g), panko preferred for extra crunch, but regular works too.
- Seasonings for Coating:
- 1 tsp paprika (smoky depth)
- 1 tsp garlic powder
- 1 tsp onion powder
- 1 tsp salt
- ½ tsp black pepper
- ½ tsp cayenne pepper (optional, adds a kick)
- Eggs: 2 large, beaten – helps the coating stick better.
- Cooking Spray or Oil: For lightly greasing the baking sheet to get that golden finish.
If you’re looking for substitutions, almond flour can replace all-purpose flour for gluten-free needs, and coconut yogurt or dairy-free milk mixed with lemon juice works as a buttermilk alternative. For a different flavor profile, try adding dried herbs like thyme or oregano to the breadcrumb mix.
Equipment Needed
- Baking Sheet: A rimmed baking sheet is ideal to keep things contained. I prefer using heavy-duty aluminum ones for even heat distribution.
- Wire Rack: Placing tenders on a wire rack over the baking sheet lets air circulate and keeps them extra crispy all around. If you don’t have one, doubling the baking sheet with parchment paper works.
- Mixing Bowls: Three bowls for flour, egg wash, and breadcrumb mix. Glass or stainless steel bowls are best—they don’t react with acidic buttermilk.
- Tongs: For turning tenders without losing that coating. Wooden or silicone-tipped tongs spare the crust from damage.
- Measuring Cups & Spoons: Accurate measurements keep the coating balanced.
On a budget? You can skip the wire rack and bake directly on a greased sheet, just flip halfway through. For cleanup, lining the sheet with foil or parchment paper helps a lot. I’ve tried silicone baking mats too, and they’re great for non-stick and easy washing.
Preparation Method
- Marinate the Chicken (10-15 minutes): Pour 1 cup (240ml) of buttermilk into a bowl, add a pinch of salt, and submerge the chicken tenders completely. Cover and let them soak at room temperature for about 10-15 minutes. This step is key for tenderness and flavor. (Tip: Don’t skip or rush this!)
- Prepare the Coating Stations:
- In the first bowl, mix 1 cup (120g) all-purpose flour with ½ tsp salt, ½ tsp pepper, and ½ tsp paprika.
- In the second bowl, beat 2 large eggs until smooth.
- In the third bowl, combine 1.5 cups (150g) panko breadcrumbs with 1 tsp garlic powder, 1 tsp onion powder, ½ tsp cayenne pepper (if using), and ½ tsp salt.
- Coat the Chicken: Remove tenders from buttermilk, letting excess drip off. Dredge each piece in the flour mixture, shaking off the excess. Then dip into the beaten eggs, letting extra drip. Finally, press into the breadcrumb mixture until fully coated. Set each on a wire rack. (Note: If the coating feels loose, a quick double-dip in egg and breadcrumbs helps.)
- Preheat the Oven: Heat to 425°F (220°C) and position racks in the center. High heat is crucial for crispiness.
- Arrange for Baking: Lightly spray the wire rack with cooking spray to prevent sticking and place the coated tenders evenly, leaving space for air circulation.
- Bake (15-20 minutes): Bake for 15 minutes, then flip the tenders using tongs and bake another 5-7 minutes until golden brown and cooked through (internal temp 165°F/74°C). Keep an eye on them the last few minutes to avoid burning.
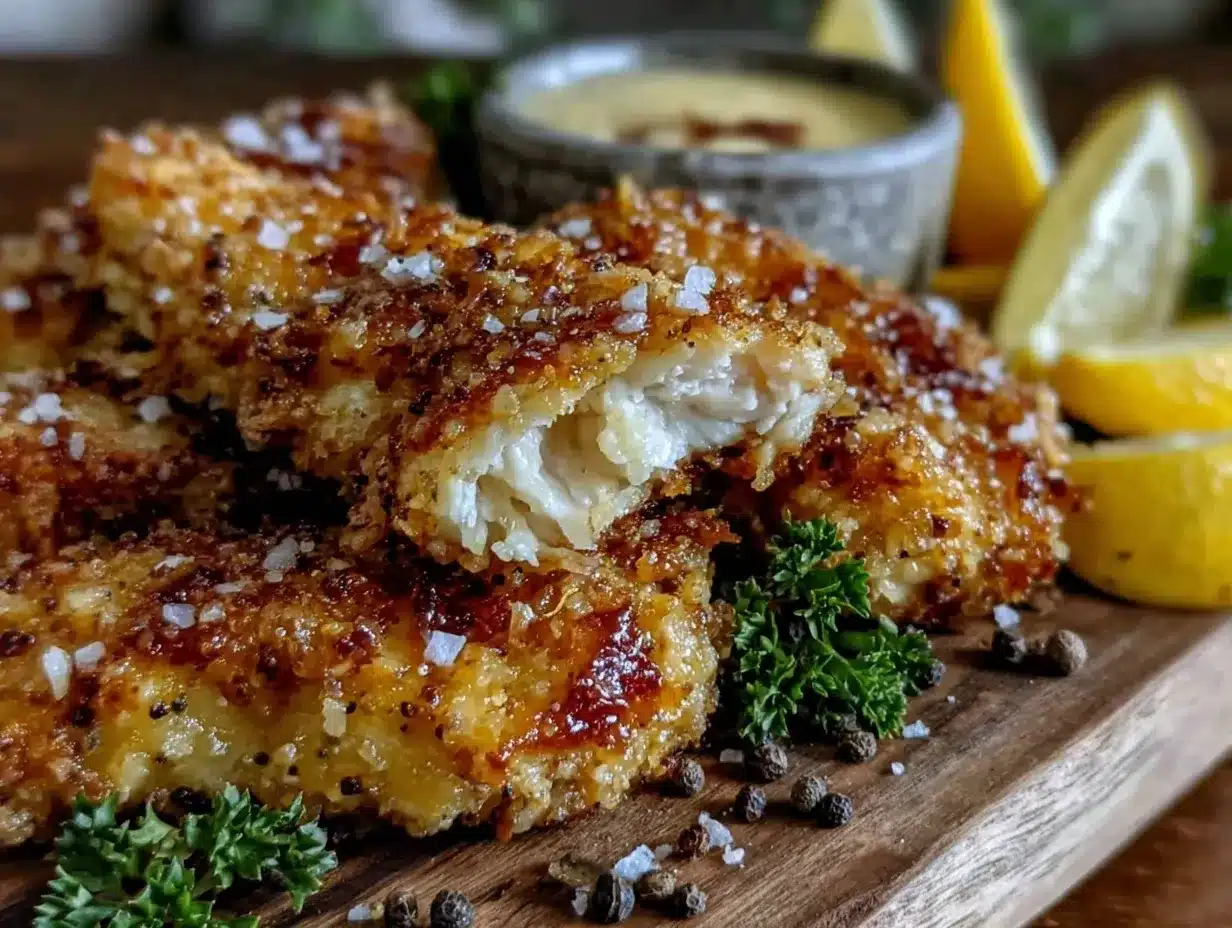
- Rest and Serve: Let the tenders sit for 5 minutes after baking to set the crust and lock in juices. Serve warm with your favorite dipping sauce.
Pro tip: If you want ultra-crisp, lightly brush the tenders with a little melted butter before baking. I learned that the hard way after a slightly dry batch—this simple trick made a big difference!
Cooking Tips & Techniques
Getting that perfect crunch without frying is all about technique and timing. Here are some tips I’ve picked up over time:
- Buttermilk Magic: Marinating in buttermilk tenderizes chicken by breaking down proteins and adds a mild tang. Don’t skip this or shorten it too much.
- Coating Layers: The triple-step coating (flour, egg, breadcrumbs) creates that crispy crust. Make sure each layer isn’t too thick or too thin—balance is key.
- Use Panko Breadcrumbs: Their airy texture bakes up crispier than regular crumbs, giving you that crave-worthy crunch.
- High Heat Baking: Baking at 425°F (220°C) helps the crust brown quickly without drying the chicken inside. Lower temps will result in soggier tenders.
- Wire Rack Trick: Elevating the tenders lets hot air circulate, preventing sogginess on the bottom. If you don’t have a rack, flip tenders halfway through baking.
- Don’t Overcrowd: Leave space between tenders on the rack or baking sheet to avoid steaming instead of crisping.
- Troubleshooting: If the coating slides off, make sure the chicken is patted dry before dredging, and don’t rush the egg dip.
Honestly, I once tried to skip the flour step to cut carbs—and the coating just didn’t stick. Lesson learned! Taking the time with each step pays off in crunch and flavor.
Variations & Adaptations
This recipe is a great base for switching things up. Here are a few ways I’ve adapted it:
- Gluten-Free Version: Swap all-purpose flour and breadcrumbs for gluten-free alternatives like rice flour and gluten-free panko.
- Spicy Kick: Add extra cayenne, smoked paprika, or even a touch of chili powder to the breadcrumb mix for a fiery twist.
- Herb-Infused: Mix chopped fresh herbs like rosemary, thyme, or parsley into the breadcrumb mixture for a fresh flavor boost.
- Air Fryer Adaptation: Cook tenders in an air fryer at 400°F (200°C) for 10-12 minutes, flipping halfway. Great for even crispier results with less oil.
- Dairy-Free: Use coconut milk or almond milk with a tablespoon of lemon juice as a buttermilk substitute.
One of my favorite personal tweaks is adding a teaspoon of grated Parmesan cheese to the breadcrumbs. It adds a subtle nutty richness that pairs perfectly with the buttermilk tang.
Serving & Storage Suggestions
These crispy oven-fried buttermilk chicken tenders are best served hot right out of the oven, but they hold up well if you need to prep ahead.
- Serving Suggestions: Pair with classic dips like honey mustard, ranch, or spicy sriracha mayo. Serve alongside a crisp salad, roasted veggies, or fries for a complete meal.
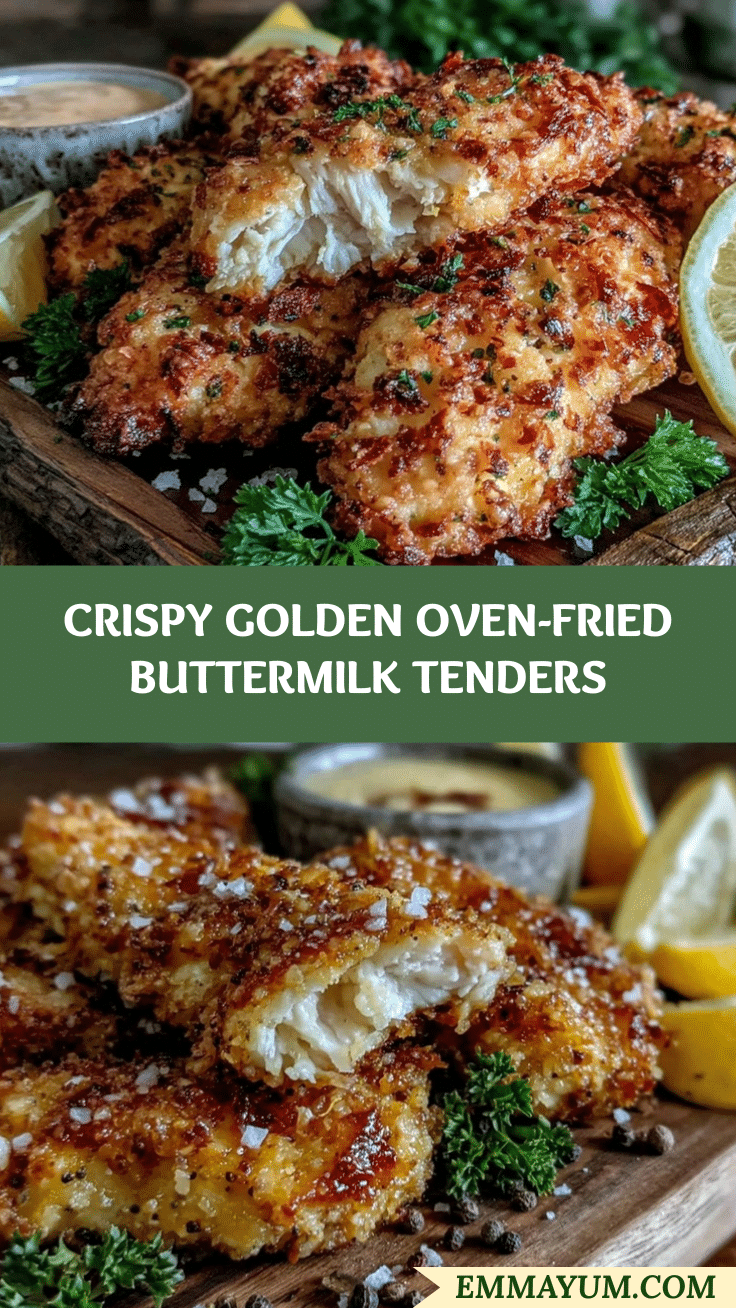
- Presentation: Arrange tenders on a rustic wooden board lined with parchment paper for a casual feel. Garnish with lemon wedges and chopped parsley for color.
- Storage: Store leftovers in an airtight container in the refrigerator for up to 3 days. Reheat in a 375°F (190°C) oven for 5-7 minutes to regain crispiness.
- Freezing: Freeze uncooked coated tenders on a tray, then transfer to a freezer bag. Bake from frozen, adding a few extra minutes to the cooking time.
- Flavor Development: While best fresh, the flavors meld beautifully overnight if you want to prepare in advance—just reheat carefully to keep crunch intact.
Nutritional Information & Benefits
Estimated per serving (based on 4 servings):
| Calories | 320 |
|---|---|
| Protein | 35g |
| Fat | 10g |
| Carbohydrates | 18g |
| Fiber | 1.5g |
Chicken tenders provide a solid protein punch essential for muscle repair and satiety. Buttermilk adds calcium and probiotics, aiding digestion. Using panko breadcrumbs keeps the carb content moderate while contributing to crunch without excess fat from frying. This recipe is naturally gluten-containing but easily adaptable for gluten-free diets.
From a wellness perspective, oven-baking reduces oil intake significantly compared to deep-frying, making this a healthier comfort food choice. Plus, the spice blend includes garlic and paprika, both known for their antioxidant properties.
Conclusion
If you’re after a homemade crunch that doesn’t require deep frying, these crispy oven-fried buttermilk chicken tenders are your new best friend. The tender meat, the tangy buttermilk marinade, and the perfectly seasoned crunchy crust come together for a satisfying bite every time. I love how adaptable this recipe is—whether you want to dial up the spice, keep it classic, or make it allergy-friendly.
Give it a try, tweak it to match your taste, and don’t hesitate to share your own spins! I’d love to hear how you make these tenders your own, so drop a comment below or tag me if you post your creation. Remember, cooking is about joy and discovery—even if you’re just after that crispy, cozy crunch on a random Tuesday night.
Happy cooking!
Frequently Asked Questions
Can I use frozen chicken tenders for this recipe?
Yes, but thaw them completely and pat dry before marinating to avoid soggy coating.
What if I don’t have buttermilk on hand?
Mix 1 cup (240ml) milk with 1 tablespoon lemon juice or vinegar, let sit 5 minutes, and use as a buttermilk substitute.
How do I keep the coating from falling off during baking?
Make sure to follow the flour-egg-breadcrumbs sequence and allow excess to drip off at each step. Also, avoid overcrowding the pan.
Can I make these tenders ahead of time?
You can coat and freeze them uncooked, then bake directly from frozen, adding a few minutes to cooking time.
What dipping sauces go best with crispy oven-fried buttermilk chicken tenders?
Classic choices include honey mustard, ranch, barbecue sauce, or spicy mayo. You can also try a fresh garlic aioli or sweet chili sauce for variety.
Pin This Recipe!
Crispy Oven-Fried Buttermilk Chicken Tenders Easy Homemade Crunch Recipe

This recipe delivers crispy, juicy chicken tenders with a homemade crunch using oven-frying instead of deep-frying. Marinated in buttermilk and coated with a seasoned triple-layer crust, these tenders are perfect for quick, fuss-free comfort food.
- Prep Time: 15 minutes
- Cook Time: 20 minutes
- Total Time: 35 minutes
- Yield: 4 servings 1x
- Category: Main Course
- Cuisine: American
Ingredients
- 1.5 pounds chicken tenders, trimmed of excess fat
- 1 cup buttermilk (240ml) for marinating
- 1 cup all-purpose flour (120g)
- 1.5 cups panko breadcrumbs (150g)
- 1 tsp paprika
- 1 tsp garlic powder
- 1 tsp onion powder
- 1 tsp salt (divided)
- ½ tsp black pepper
- ½ tsp cayenne pepper (optional)
- 2 large eggs, beaten
- Cooking spray or oil for greasing the baking sheet
Instructions
- Marinate the chicken: Pour 1 cup of buttermilk into a bowl, add a pinch of salt, and submerge the chicken tenders completely. Cover and let soak at room temperature for 10-15 minutes.
- Prepare the coating stations: In the first bowl, mix 1 cup all-purpose flour with ½ tsp salt, ½ tsp pepper, and ½ tsp paprika. In the second bowl, beat 2 large eggs until smooth. In the third bowl, combine 1.5 cups panko breadcrumbs with 1 tsp garlic powder, 1 tsp onion powder, ½ tsp cayenne pepper (if using), and ½ tsp salt.
- Coat the chicken: Remove tenders from buttermilk, letting excess drip off. Dredge each piece in the flour mixture, shaking off excess. Dip into beaten eggs, letting extra drip. Press into breadcrumb mixture until fully coated. Set each on a wire rack. For a thicker coating, double-dip in egg and breadcrumbs.
- Preheat the oven to 425°F (220°C) and position racks in the center.
- Lightly spray the wire rack with cooking spray to prevent sticking and place coated tenders evenly, leaving space for air circulation.
- Bake for 15 minutes, then flip tenders using tongs and bake another 5-7 minutes until golden brown and cooked through (internal temperature 165°F/74°C).
- Let tenders rest for 5 minutes after baking to set the crust and lock in juices. Serve warm with your favorite dipping sauce.
Notes
For ultra-crisp tenders, lightly brush with melted butter before baking. Use a wire rack to allow air circulation and prevent sogginess. If you don’t have a wire rack, flip tenders halfway through baking on a greased baking sheet. Marinating in buttermilk is essential for tenderness and flavor. Avoid overcrowding the pan to keep tenders crispy. For gluten-free, substitute flour and breadcrumbs with gluten-free alternatives. You can freeze uncooked coated tenders and bake from frozen, adding a few extra minutes to cooking time.
Nutrition
- Serving Size: Approximately 4-5 ch
- Calories: 320
- Fat: 10
- Carbohydrates: 18
- Fiber: 1.5
- Protein: 35
Keywords: crispy chicken tenders, oven-fried chicken, buttermilk chicken, homemade chicken tenders, easy chicken recipe, baked chicken tenders, panko chicken, comfort food